Easy Snuggle Bear Crochet Pattern (Free & Beginner Friendly)
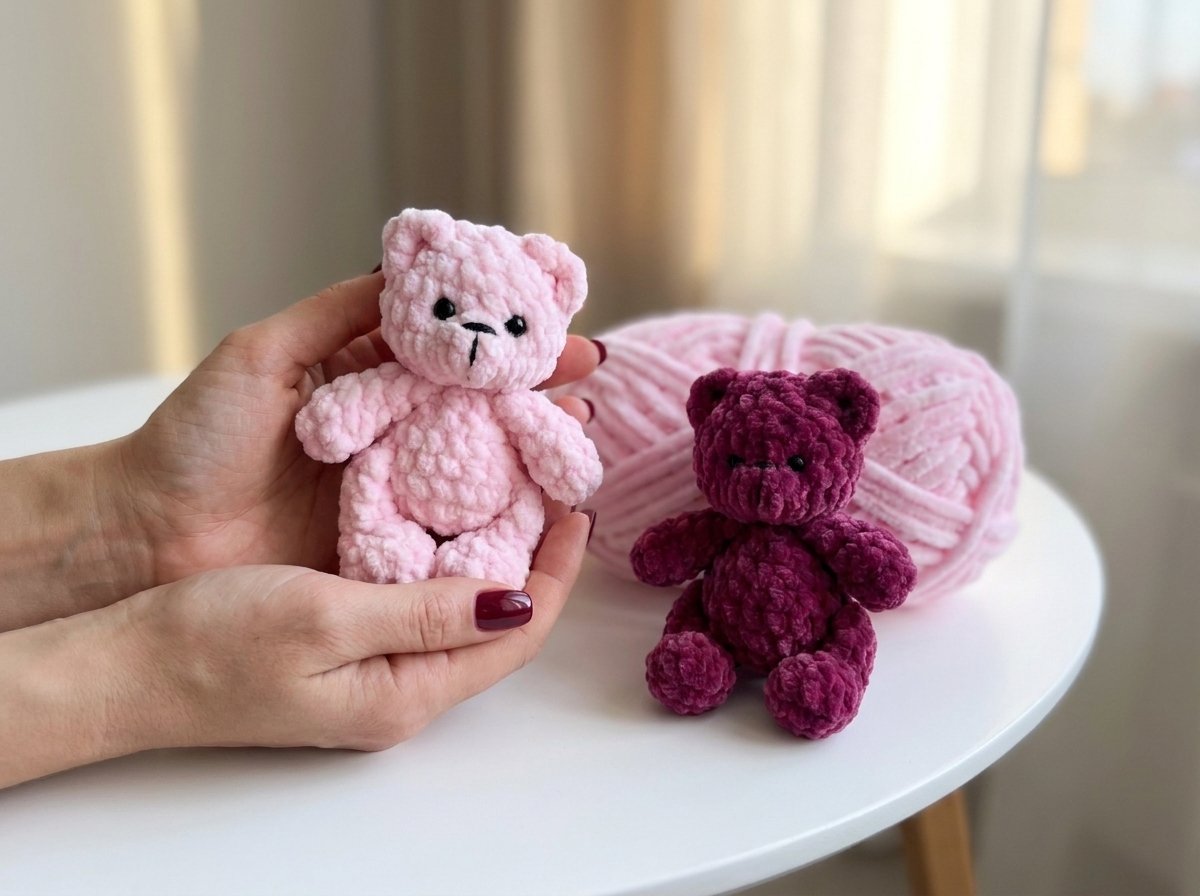
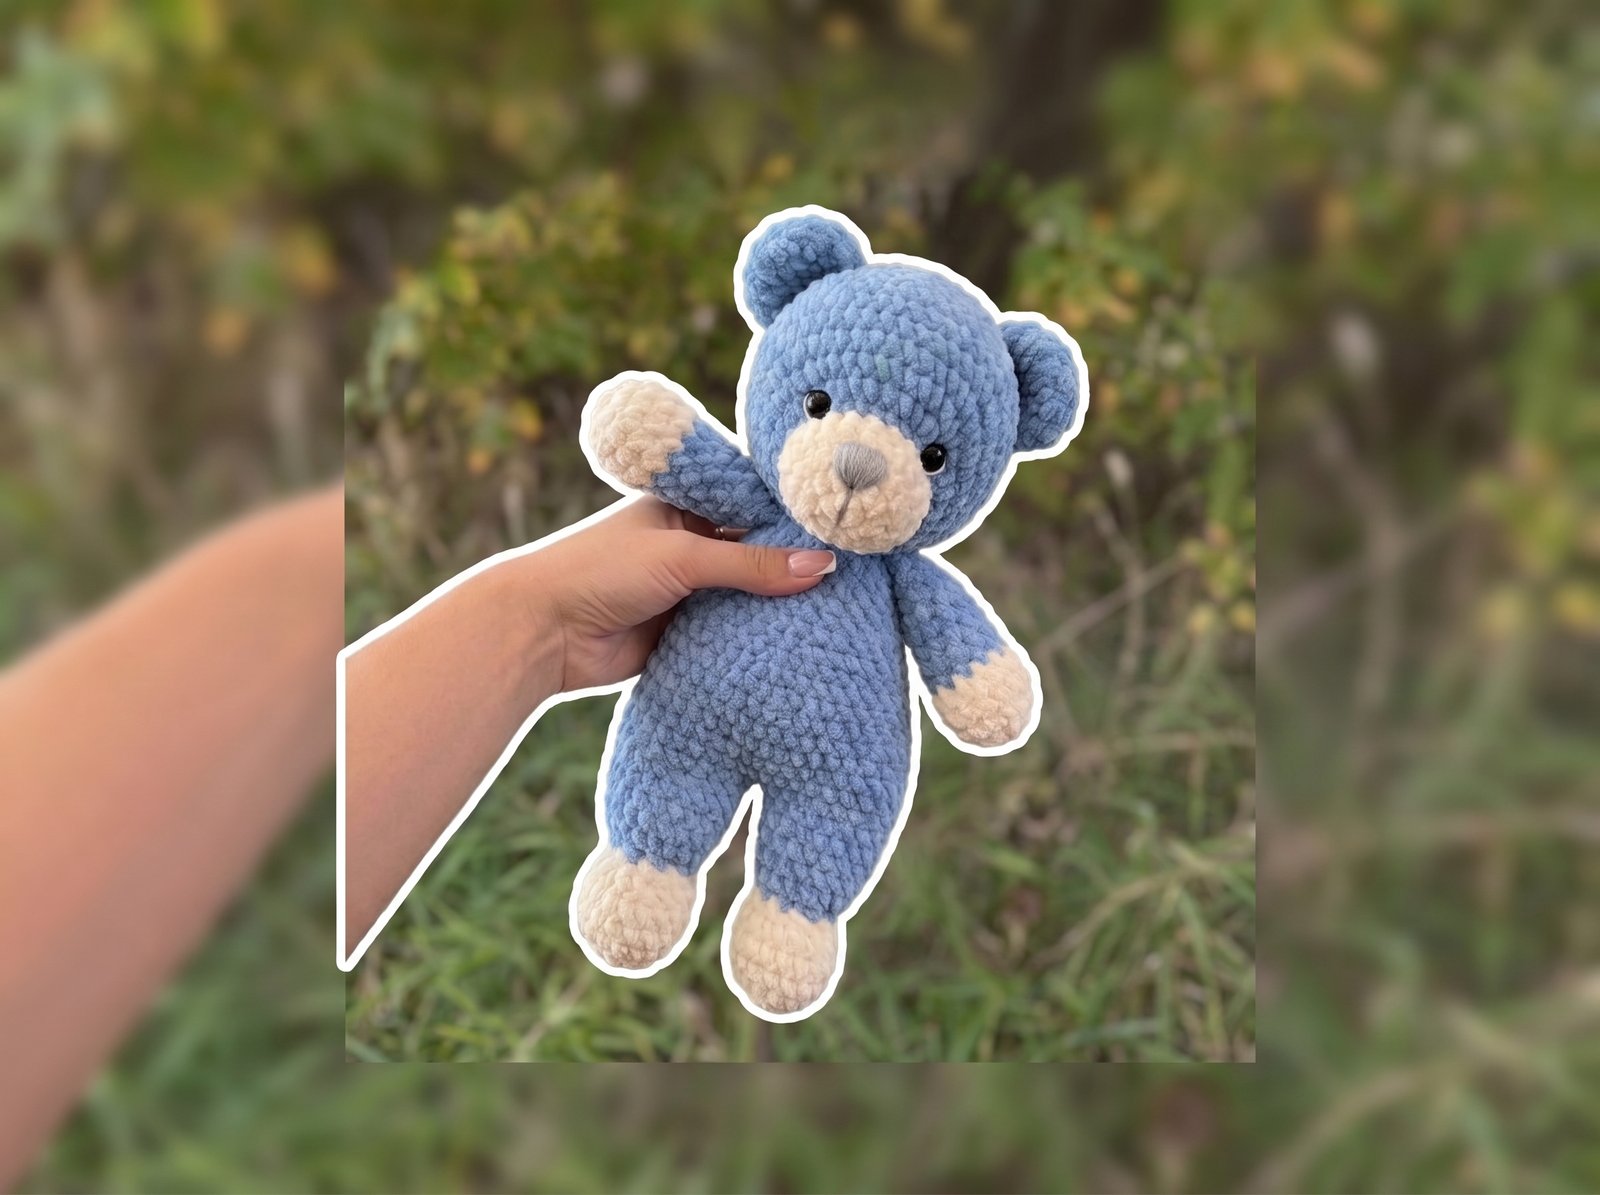
There’s something extra special about making a soft crochet bear that you can actually cuddle, and this Snuggle Bear is one of my favorite cozy projects. I designed this bear to have a soft, floppy body with a firmly stuffed head and feet, giving it that sweet, snuggly lovey-style feel.
I used Himalaya Dolphin Baby yarn for this project because it gives the finished bear an incredibly soft and plush texture. The pattern is worked in simple amigurumi rounds, making it a relaxing project once you get comfortable with the basic stitches.
The finished bear measures approximately 13 inches (33 cm) when made with the recommended materials.
Important: Please read the stuffing and joining instructions carefully, especially the foot stuffing at Round 9 and the fact that the body is intentionally left unstuffed.
Materials You’ll Need
Here’s everything I used to make my Snuggle Bear:
| Material | Amount / Details |
| Himalaya Dolphin Baby yarn | 1.5 skeins in brown/beige |
| Himalaya Dolphin Baby yarn | Small amount of white |
| Facial embroidery yarn | Optional |
| Crochet hook | 4 mm |
| Safety eyes | 16 mm black |
| Sewing needle | Long needle for sewing parts together |
| Stuffing | Holofiber or polyester fiberfill |
| Scissors | 1 pair |
| Stitch markers | Optional, but recommended |
Finished Size: Approximately 13 inches (33 cm) using the recommended materials.
Get This Monster Squad Pattern Free PDF
If you love making cute amigurumi, you can also sign up for cozy crochet inspiration and get a free 11-piece Halloween amigurumi PDF pattern delivered straight to your inbox.
Crochet Abbreviations
Before starting, I recommend keeping this abbreviation table nearby while you work.
| Abbreviation | Meaning |
| mr | Magic ring |
| ch | Chain stitch |
| sc | Single crochet |
| hdc | Half double crochet |
| dc | Double crochet |
| sl st | Slip stitch |
| inc | Increase — 2 sc in the same stitch |
| dec | Decrease — single crochet 2 stitches together |
| (…) | Number of stitches in the round |
| (…)*n | Repeat the sequence in brackets n times |
Head Instructions
I begin the head with my brown/beige yarn and work continuously in rounds.
| Round | Instructions | Stitches |
| R1 | 6 sc in mr | 6 |
| R2 | 6 inc | 12 |
| R3 | (1 sc, inc) × 6 | 18 |
| R4 | (2 sc, inc) × 6 | 24 |
| R5 | (3 sc, inc) × 6 | 30 |
| R6 | (4 sc, inc) × 6 | 36 |
| R7–R11 | 36 sc all around | 36 |
| R12 | (4 sc, dec) × 6 | 30 |
| R13 | (3 sc, dec) × 6 | 24 |
| R14 | (2 sc, dec) × 6 | 18 |
| R15 | (1 sc, dec) × 6 | 12 |
Safety Eyes & Stuffing
I insert the 16 mm black safety eyes between R9 and R10, leaving approximately 6–7 stitches between them.
As I continue working the head, I begin adding stuffing.
Important: I do not close the head completely at this point.
Leave the head at 12 stitches so that it matches the opening of the body. Stuff the head firmly and leave a long yarn tail for sewing.
Important: Do NOT close the head completely. Leave it at 12 stitches to match the body opening.
Ears — Make 2
For both ears, I use my brown/beige yarn.
| Round | Instructions | Stitches |
| R1 | 6 sc in mr | 6 |
| R2 | 6 inc | 12 |
| R3 | (1 sc, inc) × 6 | 18 |
| R4 | 18 sc all around | 18 |
| R5 | 18 sc all around | 18 |
| R6 | (1 sc, dec) × 6 | 12 |
Finish with a sl st to close.
Fasten off and leave a long yarn tail for sewing.
I do not stuff the ears. Sew them to the head between rounds 10–13, positioning them slightly toward the sides and angling them outward for that classic bear appearance.
Muzzle — Optional Detail
For the muzzle, I use white or cream yarn.
| Round | Instructions | Stitches |
| R1 | 6 sc in mr | 6 |
| R2 | 6 inc | 12 |
| R3 | (1 sc, inc) × 6 | 18 |
| R4 | (2 sc, inc) × 6 | 24 |
Finish with a sl st to close.
Fasten off and leave a long tail for sewing.
I stuff the muzzle very lightly, using only a small amount of fiberfill. Sew it to the face, centered below the eyes, between rows 4–7. This gives the bear a soft, raised 3D snout.
Legs and Body
The legs are worked separately first, and then I join them together to create the body.
First Leg
I begin the first leg with white yarn.
| Round | Instructions | Stitches |
| R1 | 6 sc in mr | 6 |
| R2 | 6 inc | 12 |
| R3 | (1 sc, inc) × 6 | 18 |
| R4 | (2 sc, inc) × 6 | 24 |
| R5 | 24 sc all around | 24 |
| R6 | 24 sc all around | 24 |
| R7 | (2 sc, dec) × 6 | 18 |
| R8 | (1 sc, dec) × 6 | 12 |
| R9 | 6 dec | 6 |
⚠️ Critical Foot-Stuffing Step
I stuff the foot firmly at R9.
This step is extremely important because once I continue beyond this point, the opening becomes too narrow to add stuffing comfortably.
I use small pieces of stuffing and push them firmly into the foot.
Change to Brown/Beige Yarn
After stuffing the foot, I change to my brown/beige yarn.
| Round | Instructions | Stitches |
| R10 | 6 inc | 12 |
| R11 | (1 sc, inc) × 6 | 18 |
| R12 | 18 sc all around | 18 |
| R13 | 18 sc all around | 18 |
| R14 | 18 sc all around | 18 |
| R15 | 18 sc all around | 18 |
| R16 | 18 sc all around | 18 |
| R17 | 18 sc all around | 18 |
Finish with a sl st, fasten off, and weave in the end.
My first leg is now complete.
Second Leg
I work Rounds 1–17 exactly the same way as the first leg.
The most important thing to remember is to stuff the foot firmly at R9.
However, there is one important difference:
Do NOT fasten off after R17.
I keep the yarn attached because I will continue directly into the body.
Joining the Legs to Form the Body
With my yarn still attached to the second leg, I do not make a chain.
Work:
- 18 sc around the first leg
- Then 18 sc around the second leg, where the yarn is attached
This gives me a total of 36 stitches for the joined round.
No chain is needed between the legs.
Body
Now I continue working the body.
| Round | Instructions | Stitches |
| R18 | (3 sc, inc) × 9 | 45 |
| R19 | 45 sc all around | 45 |
| R20 | 45 sc all around | 45 |
| R21 | 45 sc all around | 45 |
| R22 | (3 sc, dec) × 9 | 36 |
| R23 | (2 sc, dec) × 9 | 27 |
| R24 | 27 sc all around | 27 |
| R25 | 27 sc all around | 27 |
| R26 | 27 sc all around | 27 |
| R27 | (1 sc, dec) × 9 | 18 |
| R28 | 18 sc all around | 18 |
| R29 | 18 sc all around | 18 |
| R30 | 18 sc all around | 18 |
| R31 | (1 sc, dec) × 6 | 12 |
Finish with a sl st to close.
Fasten off and leave a long yarn tail for sewing.
Do Not Stuff the Body
The body is intentionally left flat and unstuffed.
This is what gives the bear its soft, flexible, snuggly lovey-style body.
The body finishes at 12 stitches, which matches the 12-stitch opening of the head. This makes it possible to join the two pieces securely.
Arms — Make 2
I begin both arms with white yarn.
| Round | Instructions | Stitches |
| R1 | 6 sc in mr | 6 |
| R2 | 6 inc | 12 |
Change to Brown/Beige Yarn
| Round | Instructions | Stitches |
| R3 | 12 sc all around | 12 |
| R4 | 12 sc all around | 12 |
| R5 | 4 dec, 4 sc | 8 |
| R6 | 8 sc all around | 8 |
| R7 | 8 sc all around | 8 |
| R8 | 8 sc all around | 8 |
| R9 | 8 sc all around | 8 |
| R10 | 8 sc all around | 8 |
| R11 | 8 sc all around | 8 |
| R12 | 8 sc all around | 8 |
| R13 | 4 dec | 4 |
Finish with a sl st to close.
Fasten off and leave a long tail for sewing.
I do not stuff the arms. Leaving them empty keeps them soft and flexible.
Sew the arms to the body at Round 27.
Assembly Instructions
Once all my pieces are finished, I assemble the bear in the following order.
Step 1 — Prepare All the Pieces
Before sewing anything together, I make sure I have:
- A firmly stuffed head, left open at 12 stitches
- A flat, unstuffed body, left open at 12 stitches
- Two unstuffed arms
- Two unstuffed ears
- A lightly stuffed muzzle, if I’m using one
- Firmly stuffed feet
Having everything prepared first makes the assembly much easier.
Step 2 — Attach the Head to the Body
Both the head and body have 12 stitches at their openings.
I align the two openings edge to edge.
Using the long yarn tail from the head and a long sewing needle, I sew the pieces together stitch-to-stitch using a whip stitch.
I connect all 12 stitches to the corresponding 12 stitches.
This creates a secure connection and helps prevent the head from becoming loose or wobbly.
Step 3 — Attach the Ears
I position the ears on the sides of the head.
Sew them securely between rounds 4–7, angling them slightly outward for the bear look.
I can also gently cup the ears while sewing them in place to give them a little more dimension.
Step 4 — Attach the Muzzle
If I’m adding the optional muzzle, I position it in the center of the face, just below and between the eyes.
The muzzle should sit approximately between rows 10–14 of the head.
I sew around its edge with small, secure stitches to create the raised bear snout.
Step 5 — Attach the Arms
I position the arms on either side of the body at Round 27.
I angle them slightly forward before sewing them securely at the top of each arm.
Step 6 — Add Optional Facial Details
For an extra finished look, I can use embroidery thread or yarn to add:
- Small curved eyebrows above the eyes
- A smile below the nose
- Whisker dots on the muzzle
- Small claw details on the paws using black embroidery
These details are completely optional, so I can keep the face simple or add as much personality as I like.
Step 7 — Final Touches
Finally, I weave in any remaining loose ends and check every attachment to make sure it is secure.
I shape the ears as needed and give the finished bear a gentle press to help everything settle into place.
My Tips for Making This Snuggle Bear
If you’re newer to amigurumi, I recommend using stitch markers to mark the beginning of each round. I also find it helpful to count my stitches regularly, especially during increase and decrease rounds.
A few details are particularly important for getting the intended result:
Keep Your Tension Consistent
Try to maintain the same tension throughout the project. Consistent tension helps the finished pieces keep their intended shape and size.
Stuff at the Right Time
The feet must be stuffed at R9 before continuing with the brown/beige section. Once the leg becomes narrower, it will be difficult to get stuffing into the foot.
The head should also be stuffed firmly as you work toward the end, while the body should remain completely unstuffed.
Check Feature Placement First
Before permanently securing the safety eyes, muzzle, or embroidered details, I recommend checking their placement first. This gives you a chance to adjust the expression before everything is sewn or locked into place.
Use Stitch Markers
Stitch markers aren’t absolutely required, but they make it much easier to keep track of your rounds and avoid accidentally losing or gaining stitches.
Take Your Time
Amigurumi is supposed to be relaxing, so don’t rush. If you lose count or something doesn’t look right, it’s worth going back and checking the previous round rather than continuing with a mistake.
Yarn Substitutions
If you can’t find Himalaya Dolphin Baby yarn, you can use another soft bulky yarn.
Some suitable alternatives include:
- Bernat Blanket
- Bulky chenille yarn
- Velvet yarn
- Another soft bulky-weight yarn
Keep in mind that changing the yarn type or thickness can change the final size and appearance of your bear.
Final Notes
I love how this construction combines a firmly stuffed plush head and feet with a soft, unstuffed body. That combination is what gives the Snuggle Bear its floppy, cuddly character.
The most important construction details to remember are:
| Key Detail | What to Remember |
| Head | Leave open at 12 stitches |
| Head stuffing | Stuff firmly |
| Safety eyes | Between R9 and R10, 6–7 stitches apart |
| Ears | Do not stuff |
| Muzzle | Optional and lightly stuffed |
| Feet | Stuff firmly at R9 |
| Second leg | Do not fasten off after R17 |
| Legs | Join with 18 sc around each leg |
| Body | Do not stuff |
| Body opening | Ends at 12 stitches |
| Arms | Do not stuff |
| Arms placement | Sew at R27 |
| Head/body joining | 12 stitches to 12 stitches |
And that’s it — my Snuggle Bear is ready for plenty of cuddles!
I hope you enjoy making this soft little bear as much as I enjoyed putting the pattern together. Take your time with the shaping, keep an eye on those stitch counts, and especially remember to stuff the feet before moving past R9.