Crochet Adidas-Style Baby Sneakers Pattern – 9 cm Baby Booties for 1–3 Months | 70 Stitches
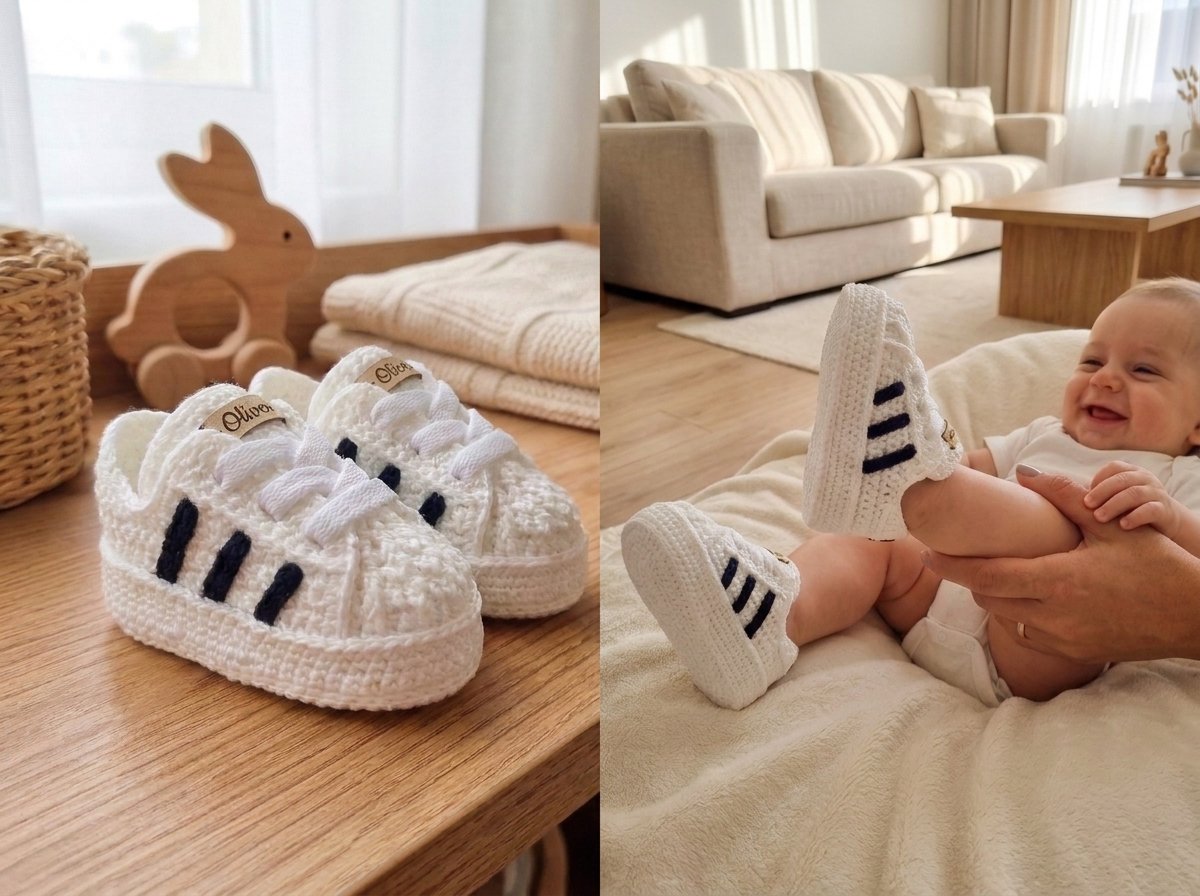
There’s something irresistible about a pair of tiny sneakers that look exactly like the “big kid” version, just shrunk down to fit a foot smaller than your hand. That’s exactly the appeal of this pair: a soft, double-soled crochet trainer finished with three raised side stripes, a lace-up front, and a little branded tag on the tongue for that just-bought-from-the-store finish.
A quick heads-up before you dive in: this is not a beginner’s first project. You’ll be working front post stitches to build the raised heel and toe ribbing, short-rows to shape the sides and tongue, and a couple of “invisible” joining tricks to keep the finish clean. If you’ve made a few amigurumi soles before and know your way around increases and decreases, you’ll be right at home.
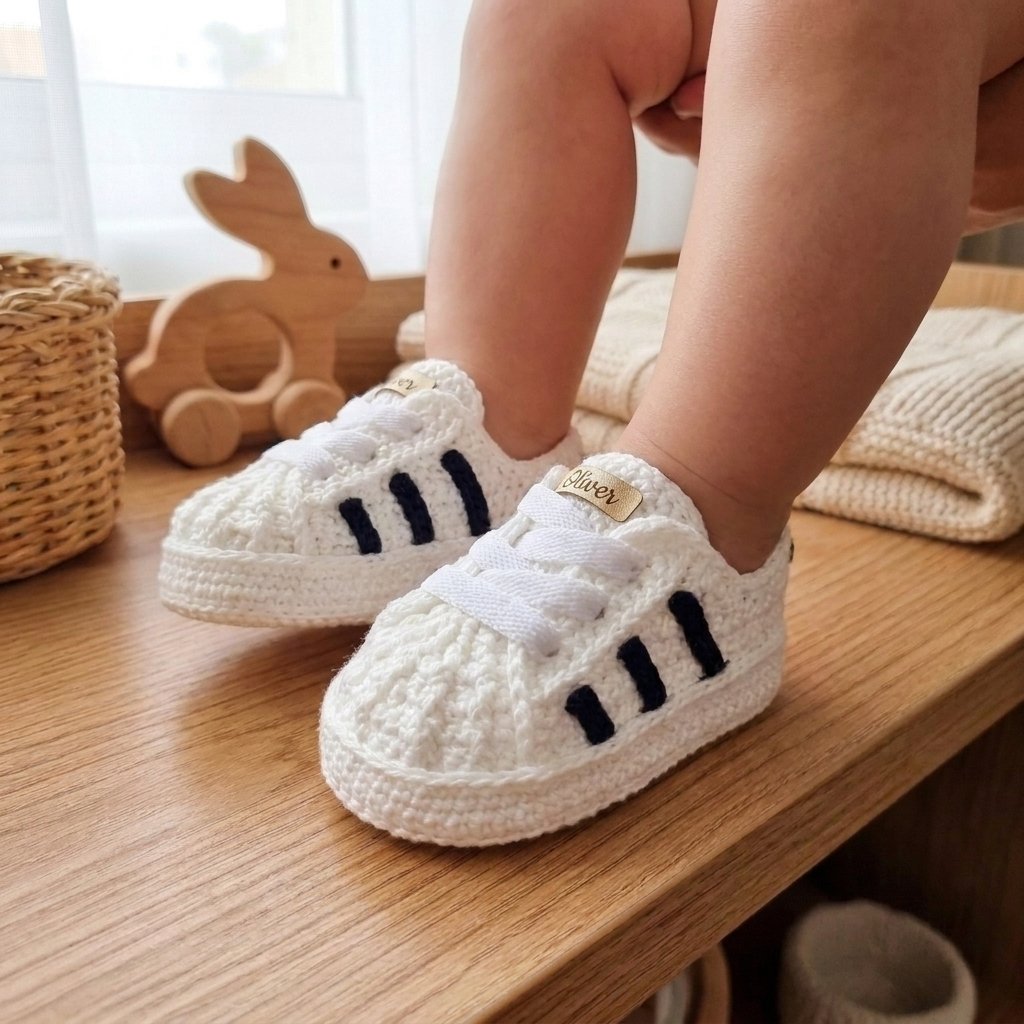
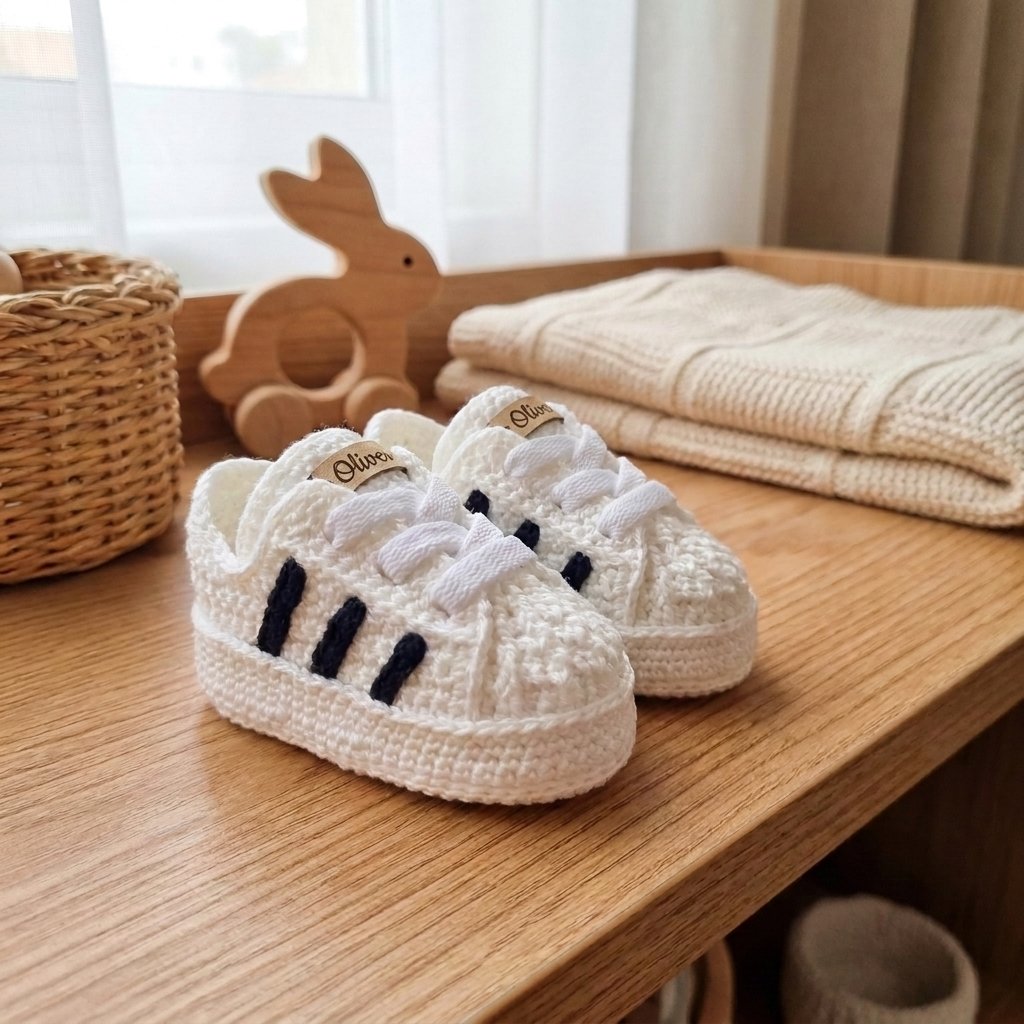


Finished Size
| Age Range | Sole Length | Sole Width |
| Newborn – 3 months (varies with baby’s foot shape) | 9 cm (3.5 in) | approx. 4.5 cm (1.75 in) |
Because this is a doubled sole (two layers glued and stitched together), no separate insole is needed — the double layer already gives the shoe structure and a bit of cushioning.
Materials You’ll Need
| Item | Notes |
| Fine cotton yarn (main color) | The maker used a lightweight “Bella Fashion” cotton for a softer drape. A slightly thicker cotton (like standard “Bella” cotton) also works and gives a firmer, more structured shoe. |
| Fine black cotton thread | Used only for the small black stripe details. A fine crochet cotton in the 150–300 tex range works; the thinner the thread, the crisper the line. |
| 1.75 mm crochet hook | Main hook for the sole and body of the shoe. |
| 1.50 mm crochet hook | Smaller hook for the fine black stripe detail — swap down a size any time you switch to the thinner black thread. |
| Flat woven shoelace | Roughly 55 cm, cut to taste depending on how you like to tie the bow. |
| Craft/fabric glue (silicone-based works well) | For gluing the two sole layers, the stripes, and the inner sole in place. |
| Small decorative label(s) | Optional — glued onto the tongue and/or heel for a “branded” look. |
| Optional: small eyelets + eyelet pliers | The original maker skipped these and worked the lace holes entirely in crochet, but you can add real metal eyelets if you prefer that finish. |
| Stitch markers or scrap yarn | Handy for marking turning points, though only really needed on the sole. |
| Foot-shaped shoe mold or last | Optional, but useful for shaping the shoe evenly while gluing. |
Abbreviations (US Crochet Terms)
| Abbreviation | Meaning |
| ch | chain |
| sl st | slip stitch |
| sc | single crochet |
| hdc | half double crochet |
| dc | double crochet |
| FPdc | front post double crochet (worked around the post of a stitch, used for the ribbed texture on the toe and heel) |
| inc | increase (2 stitches in one) |
| dec | decrease (2 stitches worked together as 1) |
| FLO / BLO | front loop only / back loop only |
| st(s) | stitch(es) |
| rnd/row | round/row |
How the Shoe Comes Together
Rather than being crocheted in one continuous piece, this sneaker is built in sections that are joined and glued as you go. Here’s the order of operations:
- Crochet the sole (make two copies — one becomes the base, one becomes the finishing insole later)
- Join the two sole layers together to make one sturdy double sole
- Build up the main “cup” of the upper from the joined sole
- Shape the front toe cap and the separate tongue piece
- Build the side walls, heel counter, and lace-hole eyelets
- Crochet the three little side stripes
- Glue everything together and finish with laces and a label
Let’s go through each stage.
Step 1: Crochet the Sole (Make Two)
Both sole layers are worked exactly the same way — you’ll need one for the outer bottom sole and a second later on for the inner finishing layer.
| Round | What to Do | Approx. Stitch Count |
| Foundation | Chain 17 | 17 ch |
| R2 | Starting in the 3rd ch from the hook, work your way around the oval: a few sc along the first straight edge, dc along the gentle curve, then 8 dc all into the very last chain to turn the toe corner, then mirror the same stitch sequence back up the other side to close the round with a sl st. | Oval outline, roughly 24 sts |
| R2 | Work an increase round: a few hdc increases at the curved end, 13 hdc worked straight along one side, a cluster of 8 evenly-spaced increases around the toe curve, another 13 hdc straight along the other side, and a final few increases to close the round. | Building toward 69–70 sts |
Once round 2 is complete, finish off neatly — the maker’s trick here is to weave the tail through the very first stitch in a way that closes the little gap left by the turning chain, so there’s no visible “step” where the round started. Repeat the whole thing for your second sole. Set one aside — it’ll come back later.
Step 2: Join the Two Soles Together
- Apply glue to the underside of just one sole (keeping it on only one side keeps the finished sole flexible rather than stiff), staying well clear of the outer edge loops — you’ll need those loops free to crochet through in the next step.
- Press the two soles together, wrong sides in, matching the edges carefully.
- Using the same yarn as your sole, join the two layers by working a slip stitch through the corresponding loops of both soles, all the way around — through the top loop of the bottom sole and the loop of the top sole together, one stitch at a time.
- Keep counting as you go. You’re aiming for 70 stitches evenly around the joined edge. If you land on 69, add a single increase somewhere along the round; if you land on 71, sneak in a decrease. Either fix blends in invisibly.
You now have one solid, double-thick sole with 70 stitches sitting evenly around its edge — this is the foundation your whole upper will be built from.
Step 3: Build the Upper “Cup” from the Sole
Working into the back loops only of your joined sole round gives you a firm base to build the walls of the shoe on.
| Round | Instructions | Stitch Count |
| 1 | Work 1 sc in the back loop of every stitch around | 70 sc |
| 2 (right side, starting from center back heel) | Count 13 sts over from the heel center, then work a short row of sc | 26 sc |
| 3 | Continue with a short row on the opposite side to match, then a longer row spanning both | 40 sc |
| 4–5 | Two full rows worked straight around, stitch directly on top of the stitch below (no increases or decreases) | 70 sc each |
This stage is worked partly in short rows and partly in full rounds — it’s what gives the heel and sides their height while leaving the front open for the toe cap and tongue you’ll add next. Take it slowly and count often; it’s easy to lose your place the first time through, but the shape reveals itself quickly once you’ve got two or three rows done.
Step 4: Shape the Toe Cap and Tongue
These two pieces are worked separately, flat, and then set into the front opening.
Toe cap (this becomes the ribbed panel that the stripes and eyelets sit on top of):
| Row | Stitch Count | Notes |
| 1 | 26 sc | Foundation row, worked from the center-front point of the base |
| 2 | 26 dc | Straight row |
| 3 | ~26 sts, worked in FPdc | This is the “ribbed” row — working around the post of the stitches below (rather than into the top loops) creates the raised, textured columns you can see running across the toe in the finished photo |
| 4–7 | Gradually decreasing (approx. 5 sts fewer per row) | Shapes the toe into a rounded point over about four more rows |
Tongue (the separate strip that sits under the laces):
| Row | Stitch Count |
| 1 | 19 sc |
| 2–4 | Decrease down to 15, then back up through 17 and 19 |
| 5–8 | 15 → 17 → 19 sc, increasing again |
| 9–14 | 19 sc, worked straight for six rows |
| 15 (final) | A relaxed row of sl sts, worked loosely so the tongue keeps its stretch |
The tongue is worked as its own free-standing rectangle and simply tucked into place under the laces at assembly time — it isn’t seamed to the toe cap along its sides.
Step 5: Side Walls, Heel Counter, and Eyelets
The sides of the shoe are built up in a stepped, staircase fashion — short rows of decreasing length are worked from the base upward, which is what gives the curved, scooped shape you see along the ankle opening.
| Stage | Approx. Rows | What’s Happening |
| Side rise (each side) | 7–8 short rows | Each row starts a few stitches in from the last, tapering the row length down as you climb — this builds the curved wall of the shoe |
| Heel counter | 4 short rows | Same tapering technique, worked at the center back for the heel cup |
| Eyelet row | 1 row, both sides | Worked as ch-2 spaces between small clusters of sc — these are your lace holes, no metal eyelets required (though you can add them if you’d like) |
| Uniforming/finishing row | 1 row around the entire opening | Sc worked evenly through the tops of all the short-row edges, which smooths out the stepped look into one clean curved edge |
This is the fiddliest part of the whole pattern, mostly because you’re constantly starting and stopping mid-row rather than working full rounds. Go slowly, and don’t worry about getting the stitch count exactly right on every single short row — the finishing row at the end absorbs small differences and evens everything out.
Step 6: The Three Side Stripes
The signature detail of this shoe is the trio of raised stripes on each side — a nod to the classic sporty trainer look, made entirely in crochet rather than fabric or felt.
Switch to your 1.50 mm hook and fine black thread for these.
| Stripe | Foundation Chain | Approx. Rows |
| Smallest | ch 7 | 5 sc rows |
| Medium | ch 9 | 5 sc rows |
| Largest | ch 11 | 5 sc rows |
Each stripe is just a small rectangle worked in plain single crochet — no shaping needed. Once all three are made (times two, for both shoes), don’t bother weaving in the yarn tails; they’ll be tucked under the strips and hidden once everything is glued down.
To place them: glue only along the edges of each stripe (never the whole surface — you want them to sit slightly raised, not flattened), then position all three at a slight diagonal across the side of the shoe, evenly spaced, matching the placement from one shoe to the other so your finished pair looks like a set.
Step 7: Assemble, Line, and Finish
- Glue the stripes in place on both sides of the shoe as described above, keeping them off the black eyelet detailing so nothing gets stained.
- Crochet a second base layer using your spare sole from Step 1 — this time working one extra row (three rows of 70 sc instead of two) so it sits slightly taller and fully covers the raw edges and glue lines left inside the shoe.
- Glue the inner sole in place, applying glue only around the last row’s edge rather than the whole surface — this keeps the finished shoe soft and flexible instead of stiff and board-like.
- Attach your labels, if using — one on the tongue, one on the heel is a nice classic placement.
- Thread the laces through your eyelet holes, working from the outside in on each side so the knot sits neatly, then tuck the tongue underneath.
- Give the laces a quick iron on a low, safe setting if you’d like them extra crisp and flat for photos.
And that’s it — a finished pair of sporty little sneakers, ready for tiny feet.
A Few Tips Worth Knowing
- Test your needle size before committing. The maker tried the same pattern in two different needle sizes with two different yarn weights to match a specific finished size — if your gauge runs different from someone else’s, a quick needle swap (up or down 0.25 mm) can bring you back in line without changing the stitch counts.
- Yarn choice changes the whole feel of the shoe. A finer, softer cotton gives a more relaxed, pliable sneaker; a firmer cotton gives a structured shoe that holds its shape almost like a real trainer.
- Keep glue away from the black detail work. Craft glue can stain fine dark thread and is fiddly to clean off without acetone, so apply it in thin lines and only where instructed.
- Leave yarn tails until the very end. Several seams and edges get worked over again later in the pattern, so tails left loose in early stages get tidied away naturally during finishing rather than needing to be woven in twice.
- Skip the branded label if you’re selling your finished shoes. If you plan to sell pieces made from this pattern, stick to your own tags rather than any recognizable brand names or logos, both for the stripes and for the toe label.