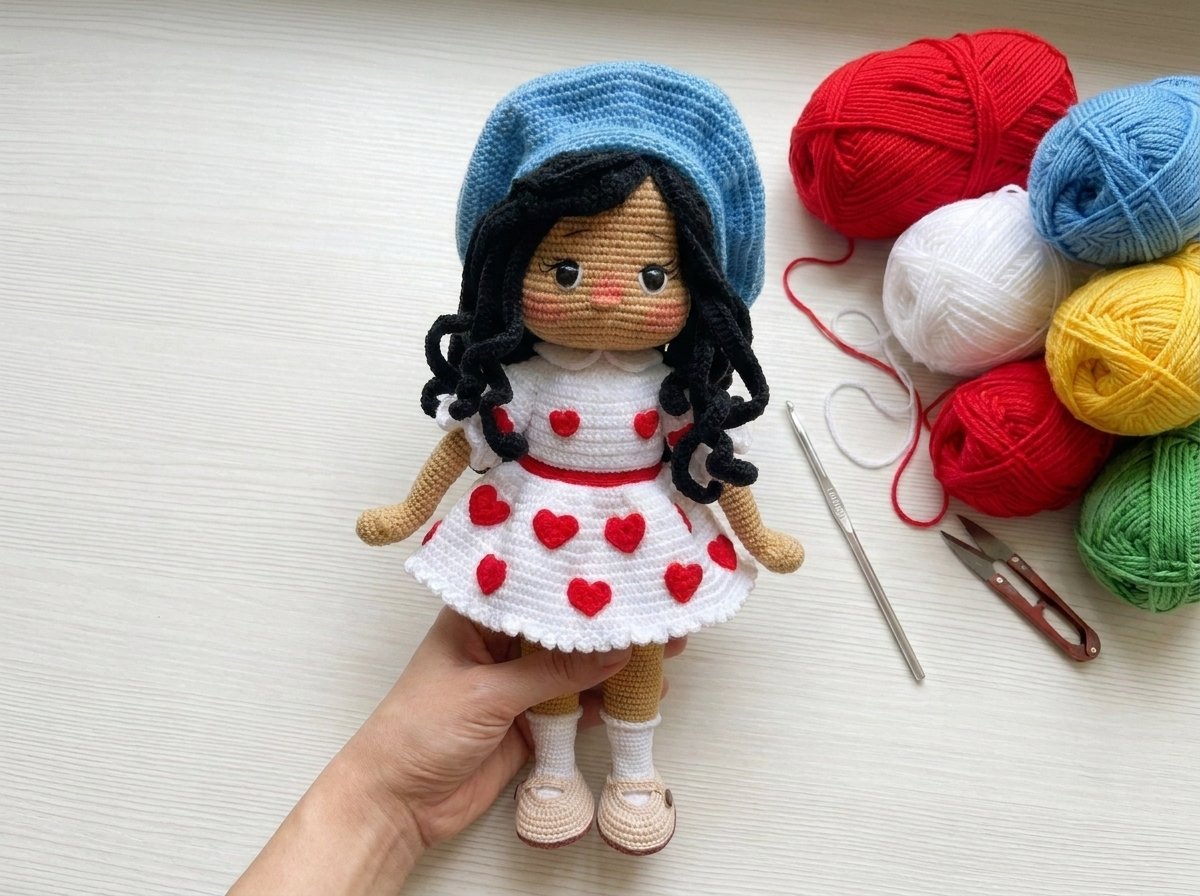
Valentina Amigurumi Crochet Doll Pattern – Easy Beginner Crochet Doll
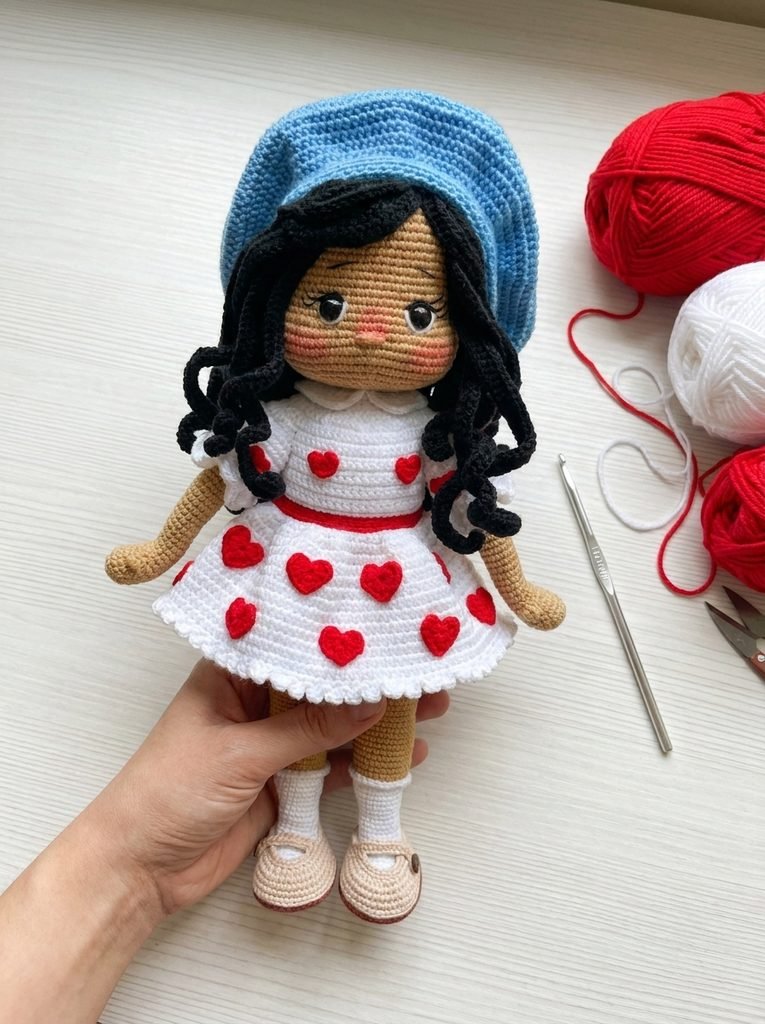
Valentina is easily the most ambitious doll I’ve designed, and also the one I’m proudest of. She’s got a fully poseable little body, integrated socks and shoes, a dress with its own collar and buttonholes, a whole head of loose loopy hair, and a soft folded beret to top it all off. There’s a lot going on, but every single piece is built from the same handful of amigurumi basics — magic rings, increases, decreases, and a lot of careful stitch counting. If you take it piece by piece, it’s genuinely manageable, even if you’re relatively new to doll-making.
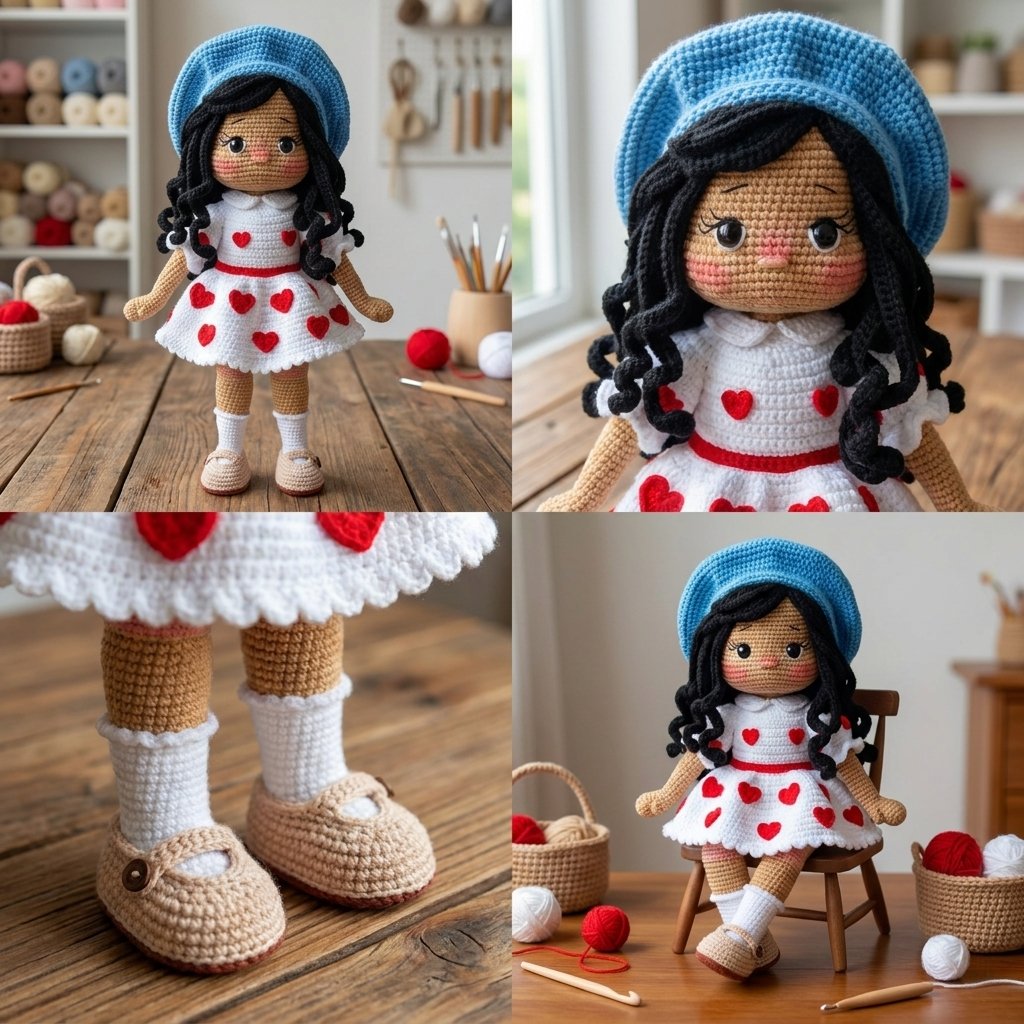
Materials
| Item | Notes |
| Cinnamon/skin-tone yarn | For the entire body, arms, legs, and head |
| White yarn | For the stockings, the dress, the inner ear/eye highlights |
| Black yarn | For the hair |
| Light blue yarn | For the beret |
| Cream or khaki yarn | For the shoe uppers |
| Chocolate brown yarn | For the shoe soles |
| Red yarn | For the dress trim and the heart appliqués |
| All yarns approx. 2mm thick | A light worsted/DK-ish weight |
| 1.75mm crochet hook | Main hook for almost everything |
| 2.0mm crochet hook | For the beret only |
| Pair of safety eyes, 1cm diameter | |
| 2 small buttons, approx. 8–9mm | For the shoe straps |
| 4 buttons, approx. 8–9mm | For the back of the dress |
| Small piece of cardboard | Cut to fit inside each shoe sole for stability |
| 48cm length of thin wire (~1mm) | For the neck armature that lets the head sit securely |
| Hot glue | For the neck armature, ear shaping, hair, and heart appliqués |
| Polyester stuffing | |
| Tapestry needle | |
| Stitch markers (several) | You’ll want more than one on hand at various points |
| Blush or coral fabric paint, thinned with water | For cheeks, nose, and knees |
| Black embroidery floss | For eyebrows and eyelashes |
| Scissors |
Abbreviations (US Terms)
| Abbreviation | Meaning |
| MR | magic ring |
| ch | chain |
| sl st | slip stitch |
| sc | single crochet |
| hdc | half double crochet |
| dc | double crochet |
| inc | increase |
| dec | decrease (2 sts as 1, unless noted as a triple/dec3) |
| BLO / FLO | back loop only / front loop only |
| st(s) | stitch(es) |
| rnd | round |
Two Joining Techniques You’ll Use Throughout
The seamless spiral join — used for the arms, legs, body, and head. Instead of closing every round with a slip stitch and chain (which leaves a visible little seam), place a stitch marker in the first stitch of each round, and when you reach the end, work a single crochet directly into that marked stitch instead. That stitch becomes the first stitch of your next round too, so move the marker there and repeat. This gives a smooth, seamless spiral finish.
The closed-round join — used for the shoes and the beret. Here, you genuinely do close every round: slip stitch into your marked first stitch, chain 1, then work your very next stitch into that same spot to begin the new round. This keeps these smaller, more structured pieces sitting flat and even rather than spiraling.
I’ll flag which technique applies at the start of each section below.
Part 1: Arms (Make 2)
Uses the seamless spiral join, in skin-tone yarn.
| Round | Instructions | Stitch Count |
| 1 | 6 sc in a magic ring | 6 |
| 2 | 6 inc around | 12 |
| 3 | (1 sc, inc) ×6 | 18 |
| 4–6 | 18 sc around (3 rounds) | 18 |
| 7 | 9 sc, 3 hdc worked into one single stitch (this forms the base of the thumb), 8 sc | 20 |
| 8 | 9 sc, a triple decrease worked over those same 3 thumb stitches, 8 sc | 18 |
| 9 | dec, 7 sc, dec, 5 sc, dec | 15 |
| 10 | 6 sc — pause here to gently push out the little thumb from the inside with the blunt end of a pair of scissors, so it pokes outward | 15 |
| 11 | dec, dec, 5 sc to the marker | 13 |
| 12 | inc, 12 sc | 14 |
| 13–39 | 14 sc around (27 rounds — this is the length of the arm) | 14 |
Stuff lightly as you go, leaving the very top a little looser since it’ll be joined to the body later. Fasten off and set aside. Repeat for a second, identical arm.
Part 2: Legs & Feet (Make 2)
This section builds an integrated sock, foot, ankle, calf, and knee, all in one piece, finishing with a color change to simulate little shorts. It starts with a small flat sole (like a shoe sole) worked in white, then most of the leg is worked in the round from there. Uses the seamless spiral join throughout unless noted.
The sole base (white):
| Round | Instructions | Stitch Count |
| Foundation | Ch 8. In the 2nd ch from hook, inc; 5 sc across; 4 sc in the last ch (the toe); mirror back along the other side of the foundation chain: 5 sc, inc in the last st | 18 |
| 2 | 1 sc (mark), inc, 5 sc, [at the 4-st toe cluster] inc + sc, then sc + inc (mirrored), 5 sc, inc, sc | 22 |
| 3–8 | 22 sc around (6 rounds) | 22 |
Shaping the heel (worked in short rows — turn your work instead of continuing the round):
| Row | Instructions | Stitch Count |
| 9 | Turn, 9 sc | 9 |
| 10 | Turn, dec, 7 sc | 8 |
| 11 | Turn, dec, 6 sc | 7 |
| 12 | Turn, dec, 5 sc | 6 |
| 13 | Turn, dec, 4 sc | 5 |
| 14 | Turn, dec down to the last few sts, ending with 4 sts remaining | 4 |
Back into full rounds, building the ankle and leg:
| Round | Instructions | Stitch Count |
| 15 | 5 hdc worked along one short edge of the heel flap, 15 loose sl sts along the sole’s remaining open edge, 5 hdc along the other short edge, 4 hdc into the leftover toe-cluster stitches | 29 |
| 16 | 5 hdc, dec, 11 sc, dec, 9 hdc | 27 |
| 17 (single crochet from here on) | 4 sc, dec, 5 sc, dec, 10 sc, dec, 6 sc, dec | 24 |
| 18 | dec, 18 sc, dec, dec (positions this shaping right behind the heel) | 21 |
| 19 | 2 sc, dec, 13 sc, dec, 2 sc (2 decreases, 4 sts apart, at center back) | 19 |
| 20 | 3 sc, dec, 9 sc, dec, 3 sc (2 decreases, 6 sts apart) | 17 |
| 21–22 | 17 sc around (2 rounds) — pause to stuff the foot carefully, not too firmly | 17 |
| 23 | 1 sc, inc, 15 sc, inc | 19 |
| 24 | 19 sc around | 19 |
| 25 | 1 sc, inc, 15 sc, inc, 2 sc | 21 |
| 26 | 21 sc around | 21 |
| 27 | 2 sc, inc, 16 sc, inc, 1 sc | 23 |
| 28–29 | 23 sc around (2 rounds) | 23 |
| 30 | 3 sc, inc, 18 sc, inc | 25 |
| 31 | 25 sc around | 25 |
| 32 | 25 sc around, worked in the back loop only (this leaves a visible strand of front loops for a decorative sock trim later) | 25 |
Color change to skin tone:
| Round | Instructions | Stitch Count |
| 33 | BLO, 25 loose sl sts (a smooth color-change join row) | 25 |
| 34 | BLO, inc, 3 sc, inc, 20 sc | 27 |
| 35–37 | 27 sc around (3 rounds) | 27 |
| 38 | inc, 4 sc, inc, 21 sc | 29 |
| 39–41 | 29 sc around (3 rounds) | 29 |
| 42 | 2 sc, dec, 2 sc, dec, 21 sc (2 decreases, 2 sts apart, at center back) | 27 |
| 43 | 5 sc, 6 sc positioned at the back for the heel curve, dec, 17 sc, dec | 25 |
| 44 | 25 sc around | 25 |
| 45 | Mark 5 sts across the front of the leg (this is where the knee forms). Work to 1 st before the marker, then 5 inc across those 5 marked sts, then continue plain to the end | 30 |
| 46 | 30 sc around | 30 |
| 47 | Mark the center-back point. Work to 1 st before it, 1 inc there, continue plain to the end | 31 |
| 48–58 | 31 sc around (11 rounds) | 31 |
Finding the fold point and switching to the shorts color: flatten the leg at the bottom of this last section to locate its two side “seams” — this tells you where you are in the round for lining up the second leg later.
| Round | Instructions | Stitch Count |
| 59–63 | 31 sc around in white (5 rounds — these become the little shorts/pants) | 31 |
The sock lace detail: working back into the leftover front-loop strands from round 32, attach white yarn and work a simple ch 1, sl st in next loop repeat all the way around for a delicate scalloped edge. Fasten off and weave in.
Both legs are identical — there’s no dedicated left or right. Make a second leg exactly the same way, but don’t fasten off on this second one; you’ll use its working yarn to join the two legs directly into the body.
Part 3: Joining the Legs Into the Body
Flatten each leg to find its center seam. On your second leg (yarn still attached), work a partial extra round if needed so its seam lines up with the first leg’s, then bridge the two with a single chain stitch.
| Round | Instructions | Stitch Count |
| 1 (the join) | Ch 1 as a bridge. Sc into one side of that bridge chain, sc all the way around leg 1 (31 sts), sc into the other side of the bridge chain, sc all the way around leg 2 (31 sts) | 64 |
| 2 | 64 sc around | 64 |
| 3 | 1 dec at center back, 1 dec at center front | 62 |
| 4–9 | 62 sc around (6 rounds) | 62 |
| 10 | dec, 13 sc, dec, 14 sc, dec, 13 sc, dec, 14 sc (4 decreases total) | 58 |
| 11 | 58 sc around | 58 |
Color change to skin tone for the torso:
| Round | Instructions | Stitch Count |
| 12 | (7 sc, dec) ×6, with 2 plain sc worked outside the repeat | 52 |
| 13–26 | 52 sc around (14 rounds) | 52 |
| 27 | 1 dec near the start, 1 dec at roughly the front-center | 50 |
| 28 | 1 dec on each side | 48 |
Part 4: Attaching the Arms
Flatten each arm to find its centered side point (opposite the thumb), and mark 4 stitches there. Do the same on both sides of the body.
| Round | Instructions | Stitch Count |
| 1 (join) | Join arm 1 by working 4 combined stitches (alternating an arm stitch with a body stitch), 20 sc across the body, join arm 2 the same way (4 combined stitches), 20 sc across the remaining body | 48 |
| 2 | On each arm’s 10 remaining free stitches: dec, 8 sc. On the body sections between the arms: dec, 8 sc (repeated on both sides) | 56 |
| 3 | 4 sc, dec, 24 sc, dec, 24 sc | 54 |
| 4 | (7 sc, dec) around | 48 |
| 5 | (6 sc, dec) around | 42 |
| 6 | (5 sc, dec) around | 36 |
| 7 | (4 sc, dec) around | 30 |
| 8 | (3 sc, dec) around — keep stuffing as you close this in | 24 |
| 9 | (2 sc, dec) around | 18 |
Adding the neck armature: fold your 48cm length of wire in half, then fold it again into a flatter, sturdier bundle, and wrap it tightly with tape, leaving one end unwrapped as the anchor point. Fill the neck opening generously with hot glue (being careful to keep it away from the working edge — you still have 10 more rounds to crochet here), then press the wrapped end of the wire into the glue and hold until set. Let it dry completely before continuing.
| Round | Instructions | Stitch Count |
| 10–19 | 18 sc around (10 rounds, forming the neck tube around the wire) | 18 |
Fill the top of this neck tube with more hot glue, fasten off, and tuck the tail in securely. Set the finished body aside — the head attaches at the very end, after the face and hair are done.
Part 5: Head
Seamless spiral join, skin-tone yarn.
| Round | Instructions | Stitch Count |
| 1 | 6 sc in a magic ring | 6 |
| 2 | 6 inc around | 12 |
| 3 | (1 sc, inc) ×6 | 18 |
| 4 | (2 sc, inc) ×6 | 24 |
| 5 | (3 sc, inc) ×6 | 30 |
| 6 | (4 sc, inc) ×6 | 36 |
| 7 | (5 sc, inc) ×6 | 42 |
| 8 | (6 sc, inc) ×6 | 48 |
| 9 | (7 sc, inc) ×6 | 54 |
| 10 | (8 sc, inc) ×6 | 60 |
| 11 | (9 sc, inc) ×6 | 66 |
| 12–23 | 66 sc around (12 rounds) | 66 |
| 24 | 5 sc, 7 inc (this forms one cheek), 10 sc, 7 inc (the other cheek), 37 sc to the marker | 80 |
Placing the eyes (optional at this stage): find the midpoint of the 10-stitch section between your two cheek clusters, go up one row, then count 4 stitches out from that midpoint in each direction — this is where each eye goes, giving you 7 stitches of separation between them. You can insert your 1cm safety eyes here now, or wait and add them after the head is stuffed and closed — either works.
| Round | Instructions | Stitch Count |
| 25–28 | 80 sc around (4 rounds) | 80 |
| 29 | (11 sc, dec) around | 73 |
| 30 | (10 sc, dec) around | 67 |
| 31 | (9 sc, dec) around | 61 |
| 32 | (8 sc, dec) around | 55 |
| 33 | (7 sc, dec) around | 49 |
| 34 | (6 sc, dec) around — pause and stuff the bottom half of the head firmly, leaving the top loose for now | 43 |
| 35 | (5 sc, dec) around | 37 |
| 36 | (4 sc, dec) around | 31 |
| 37 | (3 sc, dec) around — pause and stuff the cheeks now | 25 |
| 38 (final) | (2 sc, dec) ×5, then dec, 1 sc, dec | 18 |
Cut the yarn and weave the tail through the remaining stitches to close, leaving a small finger-sized gap unstuffed at the base — that’s where the neck will be glued in later. Set the head aside for now; face details and hair come next.
Part 6: Face Details
- Eye highlights: using white yarn and your needle, stitch a small crescent-shaped highlight at the base of each eye by passing the needle underneath the eye, pulling it snug into a compact loop, and securing the knot inside the head where it won’t show.
- Eyebrows and eyelashes: using black embroidery floss, work a small fan of 3–4 short stitches radiating from the outer top corner of each eye for the lashes, and a single longer stitch positioned about 4 rows above each eye for the brow. This part is genuinely a bit of freehand eyeballing — small variations between the two sides read as charming rather than uneven.
- The nose: one row below the eyes, find the 3 center stitches (leaving 2 free on either side). Take a stitch through those 3 stitches with skin-tone yarn, then wrap your working yarn snugly around that same stitch 2–3 times to build up a small, rounded nose — fewer wraps for something more delicate, more wraps for a more pronounced shape.
- Blush: mix a coral fabric paint with a little water into a light wash, and lightly dab it onto the cheeks, just above the nose, and on the knees (since the dress leaves them peeking out).
Part 7: Ears (Make 2)
Using a reference point a few stitches from your lash detail, count over 5 stitches and down 5 rows, marking the corners of this little zone with pins.
- Pick up 5 stitches diagonally across those marked rows — the first and last picked up straight, the middle three picked up one stitch further back each time, which is what gives the ear its natural curve.
- Turn and work 1 sc, 3 hdc, and a slip stitch to shape the little curved flap.
- Fasten off, then use the tail to gently cinch the ear into a slightly curled, rounded shape before tucking the end inside.
Repeat for the second ear, working the same shaping but starting from the opposite direction so the curve mirrors correctly.
Part 8: Hair
All worked in black yarn with your 1.75mm hook.
The base cap (this sits on top of the head like a little skullcap that the loops attach to):
| Round | Instructions | Stitch Count |
| 1 | 6 sc in a magic ring | 6 |
| 2 | 6 inc around | 12 |
| 3 | (1 sc, inc) ×6 | 18 |
| 4 | (2 sc, inc) ×6 | 24 |
| 5 | (3 sc, inc) ×6 | 30 |
| 6 | (4 sc, inc) ×6 | 36 |
| 7 | (5 sc, inc) ×6 | 42 |
| 8 | (6 sc, inc) ×6 | 48 |
| 9 | (7 sc, inc) ×6 | 54 |
| 10 | (8 sc, inc) ×6 | 60 |
| 11 | (9 sc, inc) ×6 | 66 |
| 12–17 | 66 sc around (6 rounds) | 66 |
The bangs (a graduated cluster of short loops): starting at one point along the cap’s edge, work: ch 12, 11 sc back down the chain, sl st into the next base stitch; ch 13, 12 sc back down, sl st into next; ch 14, 13 sc back down, sl st into next; then ch 15, 14 sc back down, sl st into next — three times in a row. That’s 6 graduated loops in total, using up 8 base stitches.
The long hair (the remaining 56 stitches): work 28 long loops evenly around the rest of the cap, skipping a stitch between each: ch 60, 59 hdc back down the chain, sl st to attach at the next skip-point. Repeat this exact loop 28 times around.
Styling: center the bangs cluster at the front of the head, about 11 rows above the eye line, and arrange the short loops into a fringe without covering the eyebrows. Drape the long loops down the sides and back, arranging them into loose waves or curls as you like — only the bangs cluster and the base cap really need a touch of glue or a couple of secure stitches; the rest of the hair hangs loose and can be styled freely.
Part 9: The Dress
Sleeves (Make 2)
| Round | Instructions | Stitch Count |
| Foundation | Ch 23, join into a ring without twisting, 1 sc in each ch around | 23 |
| 2 | (1 sc, inc) around, with the final leftover stitch worked as an extra inc | 35 |
| 3–10 | 35 sc around (8 rounds) | 35 |
| 11 | (dec, 1 sc) around, ending with a final decrease on the last 2 sts | 23 |
Fasten off using an invisible join (draw the tail through the last two loops to mimic a seamless slip stitch), and weave in the end. Repeat for a second sleeve.
Bodice (with sleeves joined in)
| Row | Instructions | Stitch Count |
| Foundation | Ch 57, sc in each ch across (skip the first ch) | 56 |
| 2–8 | Ch 1, turn, 56 sc across (7 more rows) | 56 |
| 9 (join sleeves) | 11 sc, join sleeve 1 (6 combined sts, alternating a sleeve st with a body st), 22 sc, join sleeve 2 the same way (6 combined sts), 11 sc | 56 |
| 10 | 11 sc, on sleeve 1’s 17 free sts: (3 sc, dec) ×3 + 2 sc, 22 sc, on sleeve 2’s 17 free sts: (3 sc, dec) ×3 + 2 sc, 11 sc | 72 |
| 11 | Same layout, this time (2 sc, dec) ×3 + 2 sc on each sleeve section | 66 |
| 12 | Same layout, this time (1 sc, dec) ×3 + 2 sc on each sleeve section | 60 |
| 13 | (4 sc, dec) repeated across the entire row | 50 |
| 14 | 50 sc across | 50 |
| 15 | (3 sc, dec) repeated across | 40 |
| 16 | 40 sc across | 40 |
| 17 | (2 sc, dec) repeated across | 30 |
| 18 | 30 sc across | 30 |
| 19 | (3 sc, dec) repeated across | 24 |
| 20 | 24 sc across | 24 |
Collar
Worked as two mirrored halves along the neck opening, using BLO increases to start.
| Side | Row | Instructions | Stitch Count |
| Left half | 1 | BLO, 11 increases worked into the back-neck edge | 22 |
| 2 | 22 sc across (through both loops now) | 22 | |
| 3 | (1 sc, inc) around | 33 | |
| 4 | Work 31 sts plain, then decrease the last 2 into 1 | 32 | |
| Right half | 1–4 | Repeat the same 4 rows, mirrored, on the other side of the neck opening | 32 |
Slip stitch the two collar halves together where they meet at the shoulders, then work one finishing round of slip stitches all around the collar’s outer edge for a neat, lace-like border.
Buttonholes: along the back opening edge, work 4 evenly spaced chain-6 loops, securing each with a slip stitch into the base fabric between them — sized to fit your 8–9mm buttons. Sew the 4 buttons onto the opposite back edge to line up with the loops.
Skirt and Ribbon Detail
The red ribbon stripe: pick up the 56 loops along the bodice’s starting foundation chain and attach red yarn.
- 56 sl st around (a smooth join row).
- Ch 1, turn, 56 sc worked into the front loop only (this leaves a visible ridge that reads like a ribbon or belt).
- Rejoin at the start: ch 50, 49 sc back down that chain (a hanging streamer), 56 sc back across the main row, ch 50 again, 49 sc back down for a second streamer, then slip stitch to close. Cut the red yarn and weave in the ends — this leaves two small ribbon tails hanging down the back.
The white ruffled skirt:
| Round | Instructions | Stitch Count |
| 1 (join) | BLO, 56 loose sl sts | 56 |
| 2 | Ch 1, turn, FLO increase in every stitch around | 112 |
| 3 | Plain hdc across all 112 sts | 112 |
From here, switch to closed rounds (slip stitch + chain 1 to join every round):
| Round | Instructions | Stitch Count |
| 4–15 | 112 hdc around (12 rounds — this flares the skirt out) | 112 |
| 16 | 112 sc around | 112 |
The scalloped hem: work this pattern all the way around: skip 2 sts with 2 slip stitches, then work (1 sc, 1 dc, 1 sc) all into the next single stitch to form a small shell. Repeat all the way around the entire hem. Fasten off and weave in the end.
Heart Appliqués
Small heart (make 8, red yarn): MR, ch 2, 1 hdc in the ring, 2 sc in the ring, ch 1, then mirror: 2 sc, 1 hdc, ch 2, sl st to close the ring. Fasten off, cinch the ring tight, and tie the two tails together (these get glued on, so there’s no need to weave them in neatly).
Large heart (make 18, red yarn): MR, ch 3, 2 dc in the ring, 3 hdc in the ring, ch 2, then mirror: 3 hdc, 2 dc, ch 3, sl st to close. Finish the same way as the small heart.
Placement: glue the 8 small hearts scattered loosely around the bodice and sleeves (roughly 2 per sleeve, 2 front, 2 back), and the 18 large hearts around the skirt in two loosely staggered rows, offsetting the upper row so each heart sits between two from the row below.
Part 10: Shoes (Make 2, Mirrored)
Closed-round join throughout. Chocolate brown for the sole, khaki/tan for the upper.
| Round | Instructions | Stitch Count |
| 1 | Ch 6. In the 2nd ch, inc; 3 sc across; 4 sc in the last ch (toe); mirror back: 3 sc, inc | 14 |
| 2 | inc, inc, 3 sc, 4 inc in a row (around the toe curve), 3 sc, 2 inc | 22 |
| 3 | inc, inc, 5 sc, inc, 2 sc, 2 inc, 2 sc, inc, 5 sc, 2 inc | 30 |
| 4 | 1 sc, inc, 7 sc, inc, 1 sc, inc, 1 sc, inc, 7 sc, inc, 1 sc | 38 |
| 5 | 3 sc, inc, 11 sc, inc, 6 sc, inc, 11 sc, inc, 3 sc | 42 |
Pause here and trace this sole shape onto your cardboard, then cut it out — you’ll glue it in shortly, but not quite yet.
| Round | Instructions | Stitch Count |
| 6 | 42 sc around, worked in the back loop only | 42 |
Glue your cardboard sole in place against this ridge now, being careful to keep glue away from the edge you’re about to keep crocheting on.
Color change to khaki/tan:
| Round | Instructions | Stitch Count |
| 7 | BLO, 42 loose sl sts | 42 |
| 8 | BLO, 42 sc around | 42 |
| 9–11 | 42 sc around, through the full stitch now (3 rounds) | 42 |
| 12 | dec, 11 sc, 8 decreases in a row, 11 sc, dec | 32 |
| 13 | 32 sc around | 32 |
The ankle strap (right shoe): 11 sl st, ch 16, skip 5 ch, 11 sc back down the remaining chain (this leaves a small gap forming the strap tab), 20 sl st to close the round.
For the left shoe, mirror this last row instead: 22 sl st, ch 16, skip 5 ch, 11 sc back down, 9 sl st to close — this puts the strap on the opposite side so your pair comes out as true mirrored lefts and rights.
Sew a small button onto the opposite side of the ankle from the strap on each shoe — test the fit against your doll’s foot first to find the ideal placement so the strap closes snugly without gapping.
Part 11: The Beret
Closed-round join throughout, worked entirely in hdc, light blue yarn, 2.0mm hook.
| Round | Instructions | Stitch Count |
| 1 | Ch 1, 7 hdc in a magic ring | 7 |
| 2 | 7 increases (1 in every stitch) | 14 |
| 3 | (1 hdc, inc) ×7 | 21 |
| 4 | (2 hdc, inc) ×7 | 28 |
| 5 | (3 hdc, inc) ×7 | 35 |
| 6 | (4 hdc, inc) ×7 | 42 |
| 7 | (5 hdc, inc) ×7 | 49 |
| 8 | (6 hdc, inc) ×7 | 56 |
| 9 | (1 hdc, inc) repeated around | 84 |
| 10 | (5 hdc, inc) ×14 | 98 |
| 11 | (6 hdc, inc) ×14 | 112 |
| 12 | (7 hdc, inc) ×14 | 126 |
| 13–22 | 126 hdc around (10 rounds — this forms the flat crown of the beret) | 126 |
| 23 | (7 hdc, dec) repeated around | 112 |
| 24 | (6 hdc, dec) repeated around | 98 |
| 25 | (5 hdc, dec) repeated around | 84 |
| 26 | (4 hdc, dec) repeated around | 70 |
| 27 | 70 hdc worked in the front loop only (this leaves a fold ridge for the brim) | 70 |
| 28–29 | 70 hdc around (2 rounds, regular — the fitted brim band) | 70 |
Fasten off and weave in the end. To wear, fold the brim band up and outward along that front-loop ridge to create the classic beret roll.
Final Assembly
- Fill the small unstuffed gap at the base of the head with hot glue, then press the body’s wire-reinforced neck into place, leaving just a little neck showing. Let it dry completely, undisturbed.
- Dress your doll: ease on the sleeves first, then settle the bodice and skirt, and fasten the back buttonholes.
- Add the shoes and fasten each ankle strap button.
- Style the hair as arranged earlier, then fold and fit the beret over the head so it frames the face nicely without covering the bangs, tacking it lightly at the back if you’d like it extra secure.