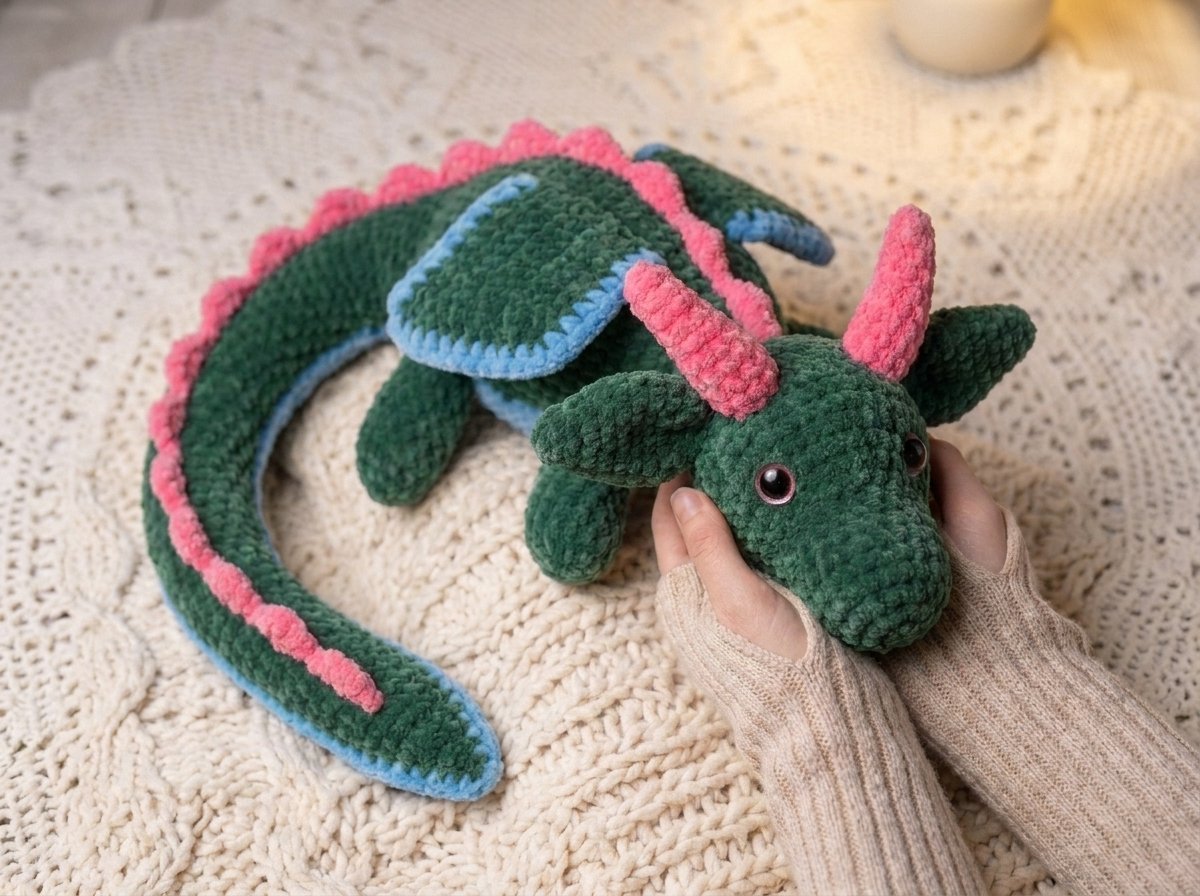
Crochet Dragon Plushie Pattern (Full Amigurumi Pattern)
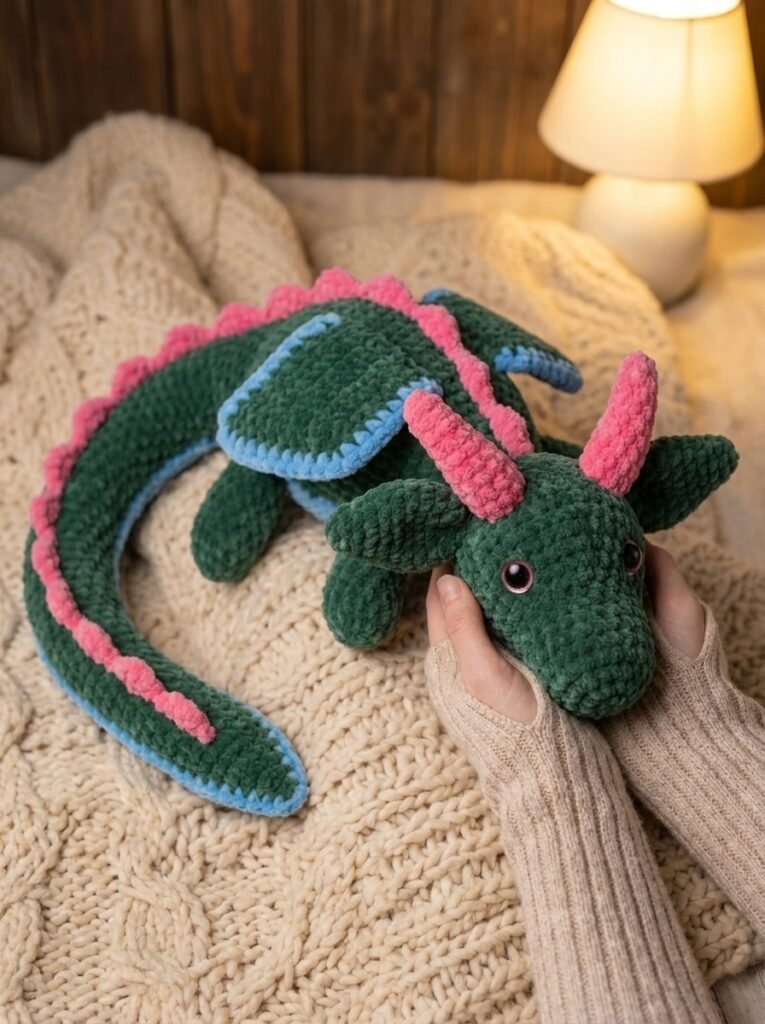
A large, detailed dragon plushie built from a single continuous head-body-neck-tail piece, plus separately worked legs, wings, horns, and ears sewn on at the end. This is a genuinely advanced, long-form project — expect a multi-session make, not a weekend one — but the payoff is a substantial, huggable dragon with real character.
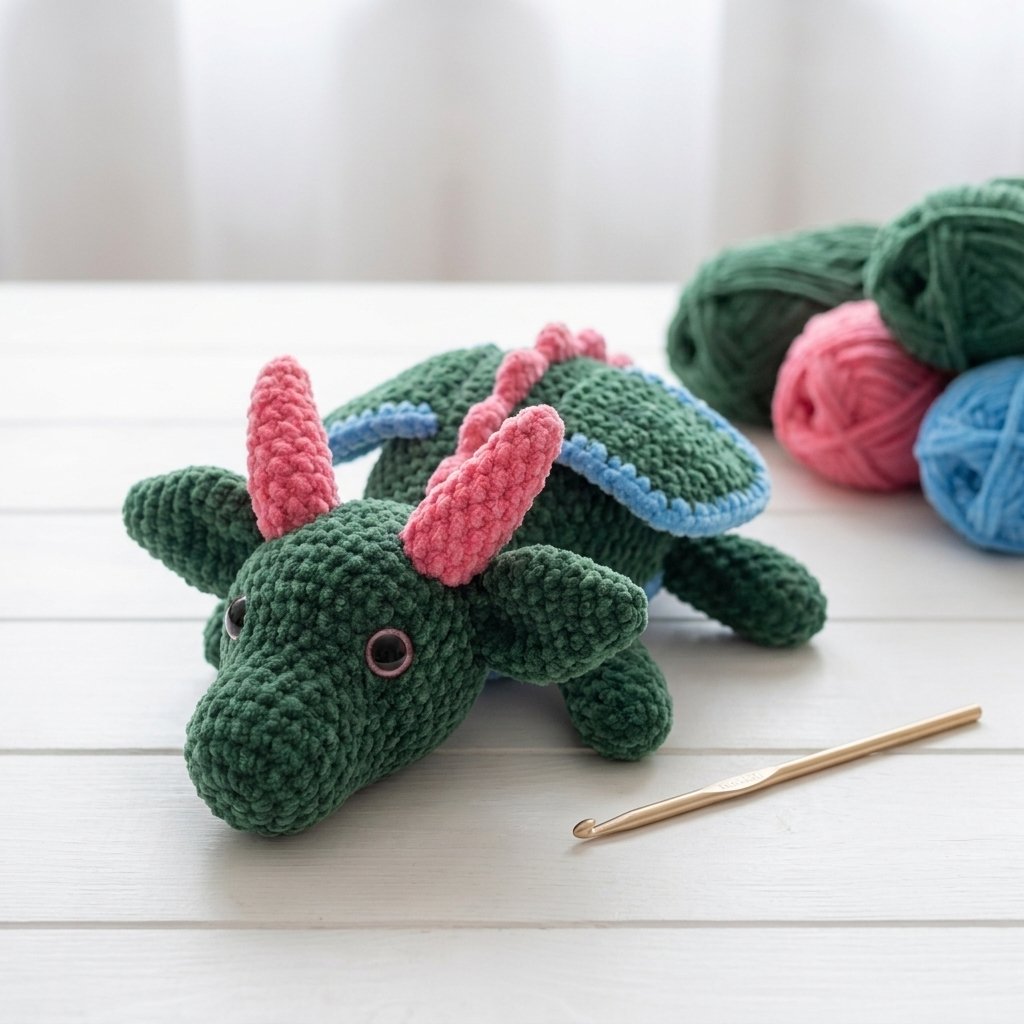
Quick glance
| Time | Skill | Finished size | Hook |
| 8–12+ hrs | Advanced | Large (tail alone runs ~55cm/22in) | 5mm |

Materials
- Chenille-style yarn, approx. 100g/120m (131yd) per skein — main body color, plus at least one accent color for horns, ears, wing trim, and tail fin
- Optional: fluffy/fur-style yarn if making the wispy “fairy dragon” tail variant
- 5mm crochet hook
- Two 18–20mm safety eyes
- Optional: small colored iris accents to tuck under each eye
- Polyester stuffing
- Yarn needle, scissors
- Stitch markers (or scrap thread tied in as a marker)
- Large knitting needles — used only as a tool to temporarily pin horns/ears in place while sewing, not for actual knitting
Terms & abbreviations
| Abbrev | Term | Notes |
| ch | chain | — |
| sc | single crochet | the only stitch used throughout |
| inc | increase | 2 sc in same st |
| dec | decrease | insert into next 2 sts, pull through, complete as 1 sc |
| st(s) | stitch(es) | — |
| row(s)/rnd(s) | rows for legs, wings, horns, ears, and the fin tail; continuous spiral rounds for the head/body/neck/tail | — |
Part 1 — Legs (make 2 front, 2 back)
Back legs are slightly larger than front legs — they share the same first 7 rows, then diverge.
Foundation: Chain 2, work 5 sc into the first chain. (5 sts)
| Row | Instruction | St count |
| 2 | inc around | 10 |
| 3 | [sc 1, inc] x5 | 15 |
| 4 | sc around | 15 |
| 5 | [sc 2, inc] x5 | 20 |
| 6 | sc around | 20 |
| 7 | [sc 3, inc] x5 | 25 |
Front leg — continue from Row 7:
| Row | Instruction | St count |
| 8–11 | sc around (4 rows) | 25 |
| 12 | [sc 3, dec] x5 | 20 |
| 13 | sc around | 20 |
| 14 | [sc 2, dec] x5 | 15 |
| 15 | sc around (final row) | 15 |
Back leg — continue from Row 7:
| Row | Instruction | St count |
| 8 | sc around | 25 |
| 9 | [sc 4, inc] x5 | 30 |
| 10–14 | sc around (5 rows) | 30 |
| 15 | [sc 4, dec] x5 | 25 |
| 16 | sc around | 25 |
| 17 | [sc 3, dec] x5 | 20 |
| 18 | sc around | 20 |
| 19 | [sc 2, dec] x5 (final row) | 15 |
Fasten off each leg leaving a long tail for sewing, and stuff before setting aside.
Part 2 — Wings (make 2, worked flat in rows)
Foundation: Chain 15.
Row 1: Skip the first chain, sc in each remaining chain. (14 sc)
Rows 2–7: Chain 1, turn, sc across. (14 sc, all 6 rows)
Row 8: Sc across only 11 stitches, leaving the remaining 3 unworked — this begins shaping the wing’s notched edge.
Rows 9–11: Sc across using only those 11 stitches. (11 sc, all 3 rows)
Row 12: Sc across only 8 stitches, leaving 3 unworked again.
Rows 13–16: Sc across using only those 8 stitches. (8 sc, all 4 rows)
By Row 16 you’ll be at the notched “spike” edge of the wing, created by the stepped-down row widths above.
Border round: Sc all the way around the entire wing’s outer edge, working 3 sc into each outer corner stitch for a rounded finish. For the last two sides, switch to a contrasting accent color and continue the same border pattern — carry the color-change tails inside the work rather than weaving them in, since they’ll be hidden by stuffing later. Slip stitch to close.
Fasten off. Repeat for a second wing.
Part 3 — Horns (make at least 2; more optional)
Worked flat in turned rows, in your accent color.
Foundation: Chain 2, work 5 sc into the first chain. (5 sts)
| Row | Instruction | St count |
| 2 | sc around | 5 |
| 3 | sc, inc, sc, inc, sc | 7 |
| 4–5 | sc around (2 rows) | 7 |
| 6 | [sc, inc] x3, sc | 10 |
| 7–10 | sc around (4 rows) | 10 |
Fasten off, leave a tail, stuff, and set aside for sewing. Make as many horns as you’d like — stopping after Row 6 gives you a shorter horn if you prefer a smaller pair.
Part 4 — Ears (make 2, body color)
Foundation: Chain 2, work 5 sc into the first chain. (5 sts)
| Row | Instruction | St count |
| 2 | inc around | 10 |
| 3–4 | sc around (2 rows) | 10 |
| 5 | [sc 1, inc] x5 | 15 |
| 6 | [sc 2, inc] x5 | 20 |
| 7–10 | sc around (4 rows) | 20 |
| 11 | [sc 2, dec] x5 | 15 |
| 12 | [sc 1, dec] x5 (final row) | 10 |
Fasten off, stuff, and set aside.
Part 5 — Head, Body, Neck & Tail (one continuous piece)
This entire section is worked in one uninterrupted piece — no sewing between the head, body, neck, and tail.
Foundation: Chain 2, work 6 sc into the first chain. (6 sts)
Round 2: inc around. (12 sts)
Rounds 3–4 (nose shaping): Work increases distributed across the round following a repeating “few sc, then inc” pattern — the exact repeat count adjusts slightly as the round doesn’t divide perfectly evenly, which is normal for this section. Don’t worry about hitting an exact number here.
Rounds 5–7 (or 5–9 for a longer nose): sc around, plain — choose 3 rounds for a shorter nose (as pictured) or 5 rounds for a longer one.
By this point you should have 20 sts total.
| Round | Instruction | St count |
| 8 | [sc 4, inc] x4 | 24 |
| 9 | [sc 5, inc] x4 | 28 |
| 10 | sc around | 28 |
| 11 | inc, then [sc 3, inc] x3, then sc 15 plain | 32 |
| 12 | inc, then [sc 4, inc] x3, then sc 16 plain | 36 |
| 13 | inc, then [sc 5, inc] x3, then sc 17 plain | 40 |
Rounds 14–19: sc around, plain. (40 sts, all 6 rounds)
Attach the eyes now, positioned between Rounds 12 and 13 — count back from your current row to find this point. Space the eyes symmetrically on either side of the flatter face area, with roughly 6–7 stitches between them. Tuck a colored iris accent under each eye before securing if you’re using them.
Head decreases:
| Round | Instruction | St count |
| 20 | dec, then [sc 5, dec] x2, then sc 17 plain | 36 |
| 21 | dec, then [sc 4, dec] x3, then sc 16 plain | 32 |
| 22 | dec, then [sc 3, dec] x3, then sc 15 plain | 28 |
| 23 | dec, then [sc 2, dec] x3, then sc 14 plain | 24 |
Neck — Rounds 24–32: sc around, plain. (24 sts, all 9 rounds)
This is a good point to stuff the head and neck firmly, before the opening narrows further up the body.
Body increases:
| Round | Instruction | St count |
| 33 | [sc 3, inc] x6 | 30 |
| 34 | inc, then [sc 4, inc] x3, then sc 14 plain | 34 |
| 35 | sc around | 34 |
| 36 | inc, then [sc 5, inc] x3, then sc 15 plain | 38 |
| 37 | inc, then [sc 6, inc] x3, then sc 16 plain | 42 |
| 38 | inc, then [sc 7, inc] x3, then sc 17 plain | 46 |
| 39 | inc, then [sc 8, inc] x3, then sc 18 plain | 50 |
Rounds 40–49: sc around, plain. (50 sts, all 10 rounds — stuff as needed while you work these)
Body decreases:
| Round | Instruction | St count |
| 50 | sc 6, then [sc 7, dec] x3, then sc 15 plain | 46 |
| 51 | sc around | 46 |
| 52 | sc 5, then [sc 6, dec] x3, then sc 15 plain | 42 |
| 53 | sc around | 42 |
| 54 | sc 5, then [sc 5, dec] x3, then sc 14 plain | 38 |
| 55 | sc around | 38 |
| 56 | sc 4, then [sc 4, dec] x3, then sc 14 plain | 34 |
| 57 | sc 4, then [sc 3, dec] x3, then sc 6, dec, sc 5 | ~29 |
(Small stitch-count variation of a stitch or two here is normal — as the pattern’s own creator notes, it’s not worth unraveling to fix.)
Round 58: sc around, plain. (29 sts)
Round 59: [sc 2, dec] x6, then sc 1. (remaining sts reduce by 6)
Rounds 60–61: sc around, plain.
Stuff the body completely at this point.
Round 62: sc around with 1 decrease placed anywhere (the belly side is a good hidden spot). (21 sts)
Part 6 — Tail (open-ended, customize the length)
From here, the tail is worked with a simple repeating rhythm rather than a fixed row count:
- Work 5–6 rounds of plain sc, no shaping.
- Work 1 round with a single decrease placed anywhere (the belly side keeps it hidden).
- Repeat steps 1–2.
Once you’re past the halfway point of your intended tail length, shift to a decrease every 7th–8th round instead, tapering more gradually toward the tip. Continue until the tail reaches your desired length and only a handful of stitches remain (around 9 is typical).
Closing the tail tip: Thread your yarn needle through the front loop of each remaining stitch, pull tight to cinch closed, then pass the tail back through the body and trim.
Two tail-finish options
Option A — Wispy “fairy dragon” tail: Using fluffy/fur-style yarn, sc plain all the way to the tail tip. At the tip, chain 10–15 stitches, then sc back down each chain to form a dangling strand. Repeat several times (5–7 strands) at the tip for a wispy fringe effect, slip stitching each new strand’s start anywhere along the fur section.
Option B — Flat finned tail (as pictured): Worked directly onto the back seam of the tail in a contrast color, this creates a row of triangular fin points running the tail’s length:
- Position 7 sc down one side of the tail seam, 1 sc through the center, then 7 sc back up the other side.
- Chain 1, turn, work a short row of 5 sc.
- Chain 1, turn, work another row of 5 sc.
- Chain 1, turn, work [dec, sc, dec] to close this point into a triangle tip.
- Turn, and repeat the whole sequence (steps 1–4) along the tail to build the next fin point, continuing until you reach the end of the tail.
Once all fin points are complete, work one final sc round around the entire tail, placing 3 sc at the tip corner for a rounded finish. Carry color-change tails inside the work rather than weaving them in.
Assembly
- Horns: Position roughly 2–3 rows above/behind the eyes, symmetrical on both sides. Use the knitting needles to temporarily pin each horn in place while you sew, attaching with a simple over-under whip stitch through the head fabric — no special technique needed, just consistent spacing on both sides.
- Ears: Attach directly behind and under the horns.
- Wings: Position in the middle of the back, sewn with the flat (bordered) side against the body.
- Legs: Attach the larger back legs and smaller front legs on either side of the body, positioned so the dragon lies naturally flat when set down.
- Eyes/face: Confirm symmetry against the body’s natural shaping lines (the increase points from Part 5 read like subtle brow lines and help guide placement) before final securing.
Common mistakes
| Mistake | Fix |
| Head/body looks lopsided | Increase/decrease placement drifted out of symmetry — use the natural corner points formed by each shaping round as a visual guide to re-center |
| Horns/ears don’t match on both sides | Sew the first one, then count rows carefully to mirror the exact placement for the second, rather than eyeballing it |
| Stuffing is hard to reach in the nose or tail tip | Stuff progressively as you go (noted at several checkpoints above) rather than waiting until the piece is fully closed |
| Tail comes out too short or too long | The tail’s length is fully up to you — track your row count as you go so you can stop cleanly at a round-decrease boundary rather than mid-repeat |
Finishing
Weave in any remaining ends. Take your time on the sewing/assembly stage in particular — symmetry between the two horns, two ears, and both leg pairs is what makes the finished dragon read as polished rather than lopsided, and it’s worth double-checking placement before committing to a permanent stitch.
Write a review
 no image