Easy Crochet Teddy Hooded Scarf Pattern
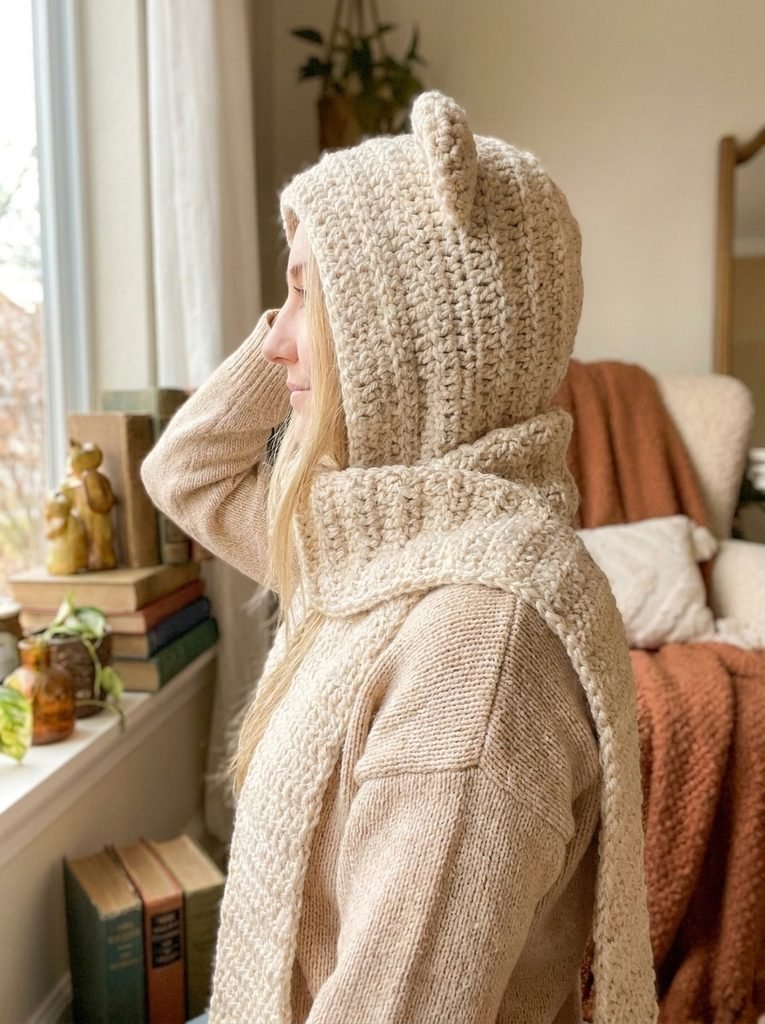
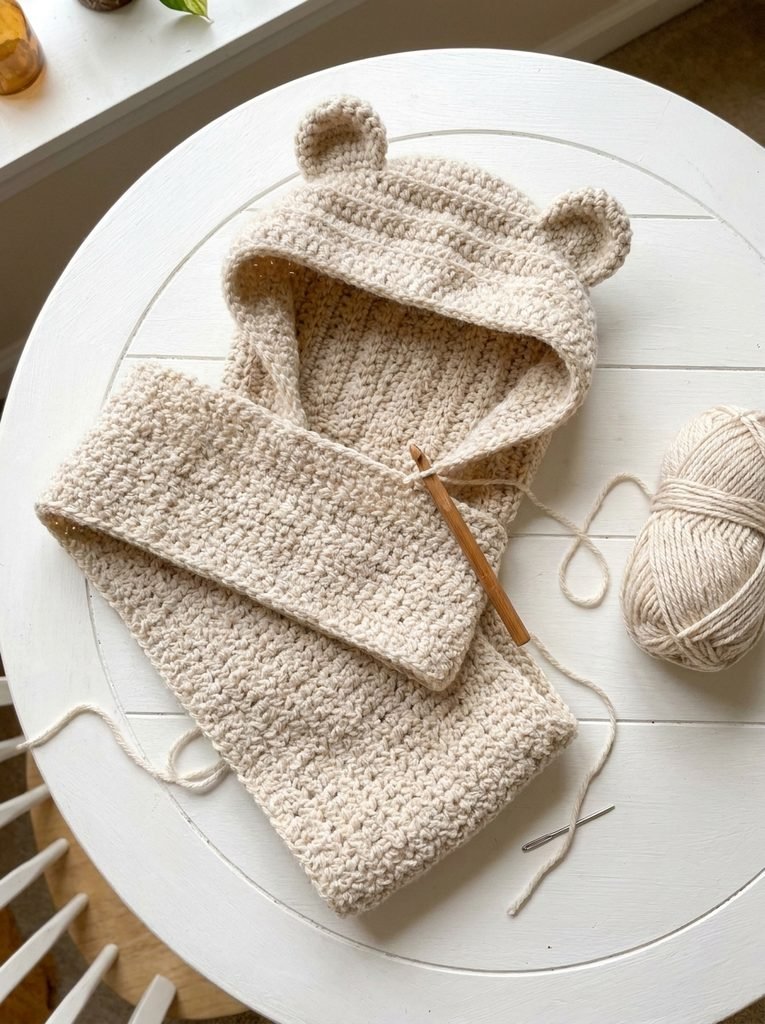
A cozy hooded scarf (sometimes called a “scoodie”) with a rounded hood, two long scarf tails that wrap around the neck, and a pair of curved teddy bear ears on top. Built entirely from double crochet using a clever “stacked single crochet” technique instead of a bulky turning chain, which keeps the fabric looking clean and seamless throughout.


Quick glance
| Time | Skill | Size | Hook |
| 5–7 hrs | Intermediate | One size (adult, based on the pictured piece) | 5mm (H8) |
A note on yarn and hook: the original video doesn’t state a specific yarn weight or hook size. Based on the chunky, fast-growing texture shown in the photos, this looks like bulky (#5) or super bulky (#6) yarn worked on a 5–6mm hook. Swatch a few rounds first to confirm your gauge feels right before committing to the full piece.
Materials
- Category 5 bulky yarn – 250m/274 yards
- Crochet hook (5mm)
- Yarn/darning needle for sewing on the ears and weaving in ends
- Scissors
- Stitch marker (optional but helpful, especially on your first try)
Terms & abbreviations
| Abbrev | Term | Notes |
| dc | double crochet | the only stitch used throughout the hood, scarf, and ears |
| stacked sc (starting dc) | a standing-style stitch used to begin every round/row in place of a turning chain | sc into the stitch, then work into the left loop of that sc only, yarn over, pull through — this stitch stands in for and counts as your first dc |
| inc | increase | 2 dc in same st |
| sl st | slip stitch | joins rounds and closes the ear |
| hdc | half double crochet | used once, in the face-edge finishing detail |
| sc | single crochet | used in the face-edge finishing detail |
| MR | magic ring | — |
| st(s) | stitch(es) | — |
| rnd(s)/row(s) | joined rounds for the hood crown; turned rows for the head and scarf sections | — |
Part 1 — Hood Crown (worked in joined rounds, flat circle)
Round 1: Magic ring. Work a stacked sc (counts as your first dc), then 9 more dc into the ring. (10 dc) Close the ring, slip stitch to the first dc, chain 1 to join.
Round 2: Stacked sc into the first dc, then work an increase into that same stitch. Continue working an increase into every stitch around. (20 sts)
Round 3: Stacked sc (1st dc, plain). *Dc 1, inc* — repeat around. (30 sts)
Round 4: Stacked sc (1st dc, plain). *Dc 2, inc* — repeat around. (40 sts)
Round 5: Stacked sc (1st dc, plain). *Dc 3, inc* — repeat around. (50 sts)
Round 6: Stacked sc (1st dc, plain). *Dc 4, inc* — repeat around. (60 sts)
Round 7: Stacked sc (1st dc, plain). *Dc 5, inc* — repeat around. (70 sts)
At the end of every round, close by slip stitching into the first stitch of the round, then chain 1 to begin the next.
Crown checkpoint table
| Round | St count |
| 1 | 10 |
| 2 | 20 |
| 3 | 30 |
| 4 | 40 |
| 5 | 50 |
| 6 | 60 |
| 7 | 70 |
Part 2 — Head Section (worked flat in turned rows)
Row 8: Work a stacked sc, then continue with 54 more dc across — that’s 55 stitches total, worked across only part of your Round 7 circle. Count and mark 15 stitches back from your last stitch, and leave those 15 stitches unworked — this gap becomes the face/neck opening.
Rows 9–15: Turn. Stacked sc, then 54 more dc across. (55 sts, constant across all 7 rows)
Part 3 — Evening the Face Edge (optional but recommended)
Work up one selvedge edge of Rows 8–15: instead of a full stitch, work 2 dc into the side of each row-end stitch as you go, from Row 15 back down to Row 8. (16 dc along this edge — 2 per row, 8 rows)
Continue across the bottom curve (the part of your Round 1–7 circle that borders the face opening) with this shaping sequence: 1 dc, 1 hdc, 1 sc, 9 slip stitches, 1 sc, 1 hdc, 1 dc. This straightens what would otherwise be a rounded curve into a cleaner line along the face edge.
Repeat the same 2-dc-per-row-end treatment up the second selvedge edge. (16 dc, matching the first side)
Part 4 — Scarf Tails (worked flat, one side at a time)
First side, Row 1: Starting at the bottom edge of the hood on one side, work a stacked sc, then 9 more dc. (10 dc — work more here if you’d like a wider scarf)
Row 2 onward: Turn. Stacked sc, then dc across to match your Row 1 count. Repeat until you reach Row 53 (or longer, if you’d like a longer scarf tail). Fasten off.
Second side: Attach a new strand of yarn on the opposite side of the neck opening and repeat the same Row 1–2 construction.
A note on length: the source video only demonstrates this second side out to Row 22 before moving on, versus 53 rows on the first side. For a symmetric scarf, work this side to match your first side’s row count — the shorter demo length appears to be for video pacing rather than an intentional design choice.
Part 5 — Ears (make 2)
Round 1: Magic ring. Stacked sc (1st dc), then 7 more dc into the ring. (8 dc) Close the ring, join with a slip stitch.
Round 2: Stacked sc into the first stitch, plus an increase into that same stitch. Continue working an increase into every remaining stitch around. (16 sts)
Round 3: Dc around, plain. (16 sts)
Round 4: Stacked sc (1st dc, plain). *Dc 3, inc* — repeat around. (20 sts)
Closing the ear: Fold the ear flat, pressing the two open edges together. Slip stitch across the folded opening, working through both layers together, for about 10 stitches to seal it into a flattened dome. Chain 1, then cut a long tail for sewing — keep the magic ring’s center tail intact too, as you’ll need it for placement. Gently press/curve the ear to give it that classic teddy-ear shape.
Assembly
- Fold the finished hood in half to locate the center back.
- Count roughly 9 rounds forward from the center, then count 18 stitches up from the bottom edge at that round — mark this spot for your first ear.
- Thread the ear’s center magic-ring tail through the marked point first, to help center the ear precisely, then use the ear’s outer sewing tail to stitch it securely in place (around Round 11 in the source video).
- Pass the remaining tail through nearby stitches to hide it, then tie off.
- Repeat for the second ear on the opposite side, using the same count-and-mark method.
- Weave in all remaining ends.
Ear placement here is somewhat visual — try the hood on (or on a mannequin/stuffed head form) partway through and adjust position slightly if needed before committing to the final stitches.
Common mistakes
| Mistake | Fix |
| Stitch count drifts during the increase rounds | Use a stitch marker in the first stitch of each round while you’re still getting used to the stacked-sc technique, and count before closing every round |
| Face opening looks lopsided | The 15-stitch gap left unworked in Row 8 needs to be centered — count carefully from your last stitch rather than eyeballing it |
| Ears look flat instead of curved | Press and shape the ear right after closing it, while the stitches still have some flexibility — it’s harder to curve convincingly once fully set |
| Scarf sides come out uneven lengths | Track your row count on both sides — the source pattern itself has an unmatched demo length, so this is worth double-checking deliberately rather than assuming symmetry |
Finishing
Weave in any remaining ends throughout. Give the finished piece a final shape-check by wearing it — the stacked-sc technique keeps the fabric flexible, so it should drape naturally once on.
Write a review
 no image